Episode 8: The Final Model Scene by Scene by Kristen Zarabozo

I’ve been avoiding this post. Obviously, months of avoidance. We’ve shifted onward, things left where they lie, everyone isn’t thinking about this thing specifically anymore. Myself included. I spent the summer focused on moving into a new house, and also battling a wave of apathy and anxiety that decided to overtake me. And, truthfully, I knew this post would be “it.” Totally arbitrary considering this show hasn’t been a reality since March. Still, there was some secret small part of me that illogically attached putting off this post with keeping something of the process in reserve; like Shrodingers cat, at once alive and dead, all possibilities in existence so long as I left the box closed. But, cruelty to animals aside, time to open the box. And besides, this is arguably the most fun part to witness aside from the actual show.

As mentioned in the post about the white model, models are kind of the rockstars of the scenic design world. More and more, digital renderings are becoming more common as a modeling tool as opposed to physically building the model. I’m personally all for both methods. I think there’s place and space for all the ways we choose to communicate as artists; using the method that best fits the situation rather than clinging to or creating arbitrary standards. In the case of Little Shop, I made a physical model. What follows are the pictures of a “scene by scene” I created using this model. Because the show was halted before actors could get into rehearsal, these depictions are mostly from my own musings, going off of conversations with the director and the rest of the creative team. No doubt the director and actors would have brought more vigor and nuance to these static shadows, but given our circumstances, this is what I built with what I had.

Pre-Show

Pre-Show

Opening “Little Shop of Horrors”

Opening “Little Shop of Horrors”

Skid Row 1

Skid Row 1

Skid Row 2

Skid Row 2

Skid Row 3

Skid Row 3

Da Doop

Da Doop

Grow for Me

Grow for Me

WSKID

WSKID

Ya Never Know

Ya Never Know

Somewhere That’s Green

Somewhere That’s Green

Closed for Renovation

Closed for Renovation

Feed Me (Git It)

Feed Me (Git It)

Transition to Dentist Office

Transition to Dentist Office

Dentist Office 1

Dentist Office 1

Now (Just the Gas)

Now (Just the Gas)

End of Act 1

End of Act 1

Intermission

Intermission

Call Back in the Morning

Call Back in the Morning

Suddenly Seymour

Suddenly Seymour

Suppertime

Suppertime

Meek Shall Inherit 1

Meek Shall Inherit 1

Meek Shall Inherit 2

Meek Shall Inherit 2

Somewhere That’s Green Reprise

Somewhere That’s Green Reprise

Don’t Feed the Plants

Don’t Feed the Plants

Here’s to all of us. The whole team who only got to dream this. May the day come where we get to make it real. But until then….

Goodnight love

Goodnight love

Episode 7: Paint Elevations by Kristen Zarabozo

IMG_0255.jpeg

There are few parts of the process that delight me as much as making the paint elevations. While having accurate drafting is certainly crucial, I would argue that paint elevations are sometimes even more crucial to ensuring that the final work looks exactly the way you as the designer would wish. Paint elevations are where you detail everything from color to texture.

I will fully admit my bias; I worked as a scenic artist for years and that training has given me a very strong appreciation for how much a good paint treatment can make or break a design. It’s important for structures to be built well an correctly, but it’s the paint and other treatments applied to the structures that almost magically shift them into the realm of the world. A good scenic artist is a designer’s best friend.

Making paint elevations is my favorite part of the process. Paint elevations are where you get to finesse all the juicy details and the sparkle. If drafting is the main body of the cake, then paint elevations are all the frosting and decoration. Making the model is fun, but much of the detail is lost because of the scale. Elevations are where you get to blow everything up big and show off all the patterns and depth that is lost in the tiny surfaces of the model. It’s the part of the process where I feel most purely like an artist, adding a stroke here and there to the work to build up the flesh and features on this body we have made.

The goal of paint elevations is simple. For every piece of scenery in the show, you want to communicate the following:

  • Color Specifics: This means not only showing the color in the piece itself, but also pulling out swatches of color that you used to get the final product. All treatments are comprised of layers of color, thus it’s really helpful to separate out those layers into a palette so scenic artist has to do less guesswork.

  • Textures: This is a big one. When looking at a paint treatment in an elevation, you can’t always tell at first glance if there is any three dimensional texture compound or if it’s simply a two dimensional treatment that’s meant to give the appearance of texture. Both approaches are valid depending on the show, but it’s definitely up to the designer to communicate which option they want because each reads very different on stage.

  • Finishes: This refers to the sheen/reflectivity of a give surface. Much like in the world of house paint, the shiny aspects of a surface are very important to note; especially for a space that is going to be flooded with very bright light. Finish is also important in determining how much maintainability a piece will have throughout the run, given how much abuse scenery and stage decks especially experience (i.e. dancing, dramatically clutching walls, etc.).

While you try and notate the broad strokes of expected paint treatments in the drafting (after all, textures and finishes definitely affect how the technical director will tech the scenery), the paint elevations are where you get granular. Combining the elevation of the piece itself with research images, swatches, and notes, you effectively communicate to the scenic artist how you want a piece to appear.

For Little Shop I chose to build the elevations of the pieces digitally, and then arrange the final full paint elevations by hand (including hand writing the notes). When creating the elevation of the pieces, you can choose to paint by hand. This has the advantage of being a representation of the piece in a medium that is directly translatable; in other words, painting by hand is often easier to transfer to painting in larger scale. However, in the case of Little Shop, I had been building the elevations digitally for the models. Thus, in the interests of time and consistency with all my material, I chose to build my large elevations digitally.

I am a fan of handpainted elevations. Usually, that’s how I tend to work. Making the digital elevations for Little Shop was in part a challenge for me. Creating textures and treatments digitally requires tools and choices that aren’t necessarily available to a scenic artist in a one-to-one relationship (ex. If I want something to fade back in Photoshop, I can toggle the opacity of that layer. Opacity in scenic painting is achieved by manipulating the opacity of the paint which obvious doesn’t always behave in the same fashion of how pixels print). The challenge for me was to create paint elevations that would clearly show the scenic artist (in this case, the fierce and indomitable Daniela Weiser) what I wanted, and that they would be treatments she could confidently translate and re-create in real life from my elevations.

When building the paint elevations for Little Shop, I would start with creating the digital elevation of the piece of scenery. Let’s use the facades that would have gone on the splay walls (Shakespeare doors) of the theatre as an example (mostly because they became my favorite elements of the show in terms of paint treatment).

Digital Elevation of the Splay Wall Covers

Digital Elevation of the Splay Wall Covers

( Side Bar: I love these facades so much because they were the result of one of my favorite collaborative moments with Dexter (Director). In an earlier version, we had thought the coverings might look like the backs of buildings. However, moving forward in development, Dexter saw that the previous choice wasn’t quite working anymore. He wanted more of a story from those units and he asked if we could make them other storefronts instead. This set off an animated back and forth where he and I volleyed ideas and came up with these two facades. We wanted to use them to deepen the layers of our Skid Row. At the top of the show, we see the pawn shop is already foreclosed, but the beauty supply shop is thriving. By the end of the show, we would see the decline of Dee’s as Audrey 2 takes over the world with its nefarious plans. Obviously this would have been very much in the background compared to the main story, but these are the details I love. These are the elements that ground you in this world, that lend more support to the events you are about to witness. And it’s always especially fun when the elements were born out of a particularly inspiring moment of collaboration).

Anyway, back to our main thrust, after the digital building of the main piece, I’ll also digitally collect swatches and research images that can help further clarify the main piece. With that done, I will print, cut, and arrange into the final paint elevation.

Final Paint Elevation for Splay Wall Covers

Final Paint Elevation for Splay Wall Covers

In this way, I built elevations that have the consistency and accuracy of the digital components, while still including a touch of the personal in the arrangement and my handwritten notes. Little Shop was a large show, and I had a lot of fun making the elevations.

Florist Shop Facade and Signs

Florist Shop Facade and Signs

Florist Shop Walls and Front Door

Florist Shop Walls and Front Door

Florist Shop Floor and Soffet

Florist Shop Floor and Soffet

Mid Stage Urban Texture Units

Mid Stage Urban Texture Units

Upstage Portal Unit

Upstage Portal Unit

City Skyline

City Skyline

Deck Treatment

Deck Treatment

Dentist Office Screens

Dentist Office Screens

Oh, did I mention that we were going to have super fun mini-plant drops fall across the storefronts as part of the Finale Don’t Feed The Plants? ;)

Oh, did I mention that we were going to have super fun mini-plant drops fall across the storefronts as part of the Finale Don’t Feed The Plants? ;)


Like I said, I’m probably just biased, but I think paint elevations are one of the best ways to see the artistry in the design. I’m proud of these and definitely feel that I improved my digital rendering skills dramatically for this show.


Squad Pod #5: Team Technical Direction by Kristen Zarabozo

PLEASE BE AWARE: At 18:27 (Kimberly is talking about how she’s sad we weren’t going to get the chance to get through tech) there is a wild and startling sound glitch that lasts 6 seconds. It’s the only time the glitch occurs and the flow of the interview was so good that I didn’t want to try another take. So I beg your forgiveness and beg that you treat it as you would an exciting moment in live theatre where perhaps an unexpected event only served to make a live experience unique.

And this week on Squad Pod we have a most remarkable and wonderful Team Technical Direction!

I cannot really emphasize how much respect I have for these people. Technical Directors are the part of the production team that takes my designer dream castles and begins to put the real-life foundations in them. Production teams are tasked with making the esoteric into a physical reality. At UConn, the technical directors for the shows are often grad students. The technical director for Little Shop, Kimberly, has multiple other credits as technical director at CRT including Good Children and Shakespeare in Love.

Kimberly and I first worked together on Henry IV. She was one of the assistant technical directors on that production. We got a tiny taste of how good our work flow might prove on that production. Turns out, as Little Shop showed us, we make a really killer team as designer and TD. Kimberly is an incredible communicator, attentive to detail, and a rock solid ally throughout the process. I look forward to the day when we get to see a show all the way through together.

The TD rockstar herself

The TD rockstar herself

Did I mention that she and I (along with other shop friends including other Little Shop squad-star Ray) have a thing for overalls?

Did I mention that she and I (along with other shop friends including other Little Shop squad-star Ray) have a thing for overalls?

The second interview is with Kimberly’s most fantastic Assistant Technical Director, Gavin. Gavin is recently graduated with his BFA from UConn (Congrats Grad!!!), and he certainly spent a good deal of time in the scene shop at the university. He also worked as a student manager for the UConn men’s ice hockey team. I mean, this is the kind of person who makes me feel like I should be out saving the world or something because he definitely did a lot within the department and outside. He is at once gracious and fierce, and I can’t wait to run into him again as well. He and Kimberly worked beautifully as a team, could not have been in better hands on this show.

The Dash in the flesh! (I gave him that code name because he always seemed to be dashing away the second Kimberly needed something, only to return so fast I started to question if he had even left….)

The Dash in the flesh! (I gave him that code name because he always seemed to be dashing away the second Kimberly needed something, only to return so fast I started to question if he had even left….)

I love this picture. A  shot of Gavin and our TD grads (Left to Right: Joey, Aubrey, (Gavin), and Kimberly). This was taken on the set of Shakespeare in Love, on which Kimberly was the TD.

I love this picture. A shot of Gavin and our TD grads (Left to Right: Joey, Aubrey, (Gavin), and Kimberly). This was taken on the set of Shakespeare in Love, on which Kimberly was the TD.

Only piece that got fully built before the hard stop was the City Skyline. Here’s the framing

Only piece that got fully built before the hard stop was the City Skyline. Here’s the framing

Here it is faced (and with faces ;)

Here it is faced (and with faces ;)

And we got a little bit of paint on it before we had to leave campus

And we got a little bit of paint on it before we had to leave campus

The paint elevation for the City Skyline (i.e. what she was supposed to look like when all was built and painted)

The paint elevation for the City Skyline (i.e. what she was supposed to look like when all was built and painted)

A model photo from the scene by scenic I built for my MFA Project Book. This would have been a moment where the City Skyline piece would have been the most visible during the performance as we traveled from the shop to the dentist office.

A model photo from the scene by scenic I built for my MFA Project Book. This would have been a moment where the City Skyline piece would have been the most visible during the performance as we traveled from the shop to the dentist office.

Disclaimers, Clarifications, Comments: Again, apologies for the sound glitch in Kimberly’s interview. These audio pieces are recorded in one take via Zoom with no editing so they are about what you’d expect in terms of overall sound quality/capabilities. Remember that these are also informal chats among colleagues where we are sharing opinions based on our own perceptions of our experiences; these perceptions are not to be misconstrued as the “only right” way to view the situation or work.

Outtakes: Podcast Rec. Room (BIPOC Edition) by Kristen Zarabozo

Anyone who knows me even a little knows that I love podcasts. I’ve definitely reached D.A.B.L.E. (Download Acquisition Beyond Life Expectancy) status in terms of how many podcasts I’m subscribed to. I find that I really want to share out a few, especially lately. So, welcome to the Recommendation Room (Rec. Room for short)! This post, I’m excited to talk about three podcasts that amplify the voices and stories of the BIPOC community. Obviously this is a very limited sample and I highly encourage you to explore the wide and beautiful world of these story tellers who are using the airwaves to bring life and color that’s so desperately needed to our planet.

Minority-Korner.png

First up we have the Minority Korner! I have only just started listening to this, and while I’m kind of sad it took me this long to “discover” it for my own airwaves, the good news is I have lots and lots and lots (like over 200 episodes, no joke) to enjoy! This podcast is hosted by James who describes himself as “ a queer, political, comedian, self proclaimed, sexy blerd (that’s Black Nerd)” and he discusses a whole host of topics that are immediately and historically pertinent to society. I feel so humbled and grateful that I have stumbled on such a substantial, hilarious, brutal, and brave podcast. I can’t wait to keep listening and I highly encourage you to do so as well.

The_Red_Nation_Podcast.png

Next up we have we have the Red Nation Podcast. It’s a podcast that amplifies the voices of a well established community that kicks serious ass. I stumbled on this one purely by accident. I’d just watched the MetHD stream of Dr Atomic and I was curious what indigenous communities had to say about the portrayal of Native Americans in that opera. Searching for articles, I found an excellent piece on the Red Nation Website that confirmed my own discomfort and dissatisfaction with the way indigenous peoples were represented in the opera (full disclosure: the article, which you can read here, was about a performance of the opera at a venue in New Mexico, not the Met performance I watched. However, the points made definitely transfer). I was beyond delighted to discover they also had a podcast. The episodes are meaty and I like to listen with full attention and no distraction. I have learned so much, had my world rocked and broken, and I can’t wait to keep having that happen as I continue to listen.

MM-280 Stuff You Missed In History Class.jpg

Let me start by disclosing that this podcast is hosted by two white women. However, the stories and topics covered on this podcast (which you can listen to here) span so much history that illuminates the BIPOC community with respect, dignity, and power. At least for my small perception, this is one of the podcasts that really began to expand my mind and worldview on just how little I knew about the history and the world beyond my narrow white-middle class-Euro-centric viewshort. There are literally hundreds of episodes to choose from, some of my own favorites being about: Robert Smalls, John Brown’s Raid on Harper’s Ferry, Harriet Tubman, Jamaica’s Maroon Wars, Freedom Riders, Ethiopia’s Rock-hewn Churches of Lalibela, Tulsa Riots and Black Wall Street, The Occupation of Alcatraz, Sojourner Truth, Hernandez v. Texas, Shirley Chisholm, Phillis Wheatley, Fort Shaw Indian School Basketball champions, Molly Spotted Elk, Great Zimbabwe, Bayard Rustin….I mean, that’s not even a fraction of the episodes available. This one has been a staple in my diet for years and I could not recommend it more highly.

My view is still far too small. I still have so much to learn and so many actions to take. My Lord calls me to a Love and Life that doesn’t have any room for complacency when it comes to facing down Hate in whatever insidious forms it takes. I am still striving, and these podcasts help keep me awake and alert. May I never fall asleep when He asks me to watch the hour with Him. May I keep listening, may keep doing.

Episode 6: Drafting by Kristen Zarabozo

IMG_9936.jpeg

Okay, so if we had to break down the design process into food groups, drafting would definitely be the vegetables. I think it’s better think of drafting as a language more than a type of drawing. I mean, certainly at a glance it’s definitely a two dimensional rendering of three dimensional objects on paper. However, the purpose of that drawing is actually more about translation. It’s taking the ideas and images swirling in that artsy brain, and ordering them into recognizable symbols that can be deciphered by those who are responsible for translating those thoughts into physical reality.

It’s worth mentioning, yet again, that I’m speaking from the perspective of a USA based designer. Here in the States, the designer is asked to provide detailed drafting plates that give an ordered breakdown of all the pieces and their arrangements onstage throughout the course of the performance.

If I’m being completely honest, it’s the part that gives me the most pause. In a model or a sketch, you can elide certain details, suggesting shapes and such without going into tiny specifics. Drafting doesn’t allow for that wiggle room. Any detail you don’t show will become a question later. Anything you don’t address, you potentially leave open to the interpretation of another. Although this is a daunting task, it’s also a weighty gift to the designer. Within the drafting plate, you can say exactly how you want something to look. It’s not about how the thing is built (that’s for the technical director to figure out) but rather how it’s supposed to look. Everything is within your purview to decide and clarify using the drafting as an illustration of your decisions.

Drafting can actually be quite beautiful. It’s a language that has been used for centuries, buildings drawn with a careful and exact hand so that other crafts people and makers could carry out the task. As drafting has become more formalized through time, it’s core mission is simple; communicate the most information about a piece clearly and accurately. Drafting for scenery has a number of conventions, even down to the thickness of a line. Drafting is the science of scenic design; a methodical system of ordering our thoughts and choices in a way that can be measured and quantified.

In drafting, scenery is rendered as if you cut it up and laid it out in flat pieces; similar to the idea of cutting into a multi tier cake and getting a good look at the layers of cake and frosting. Although every package is a little different, there are some things that are consistent. The package for Little Shop began as most do:

Groundplan for Little Shop of Horrors

Groundplan for Little Shop of Horrors

We begin with the ground plan of the whole set at what I would call it’s “resting” state; this is a personal designation that I make of how the set looks (usually) at the top of the show. This cut is as if we took a giant serrated knife through the whole theatre at a height of 6 feet (ish), and cut horizontally through. Everything we cut through at that height has the hatching (diagonal line pattern). Similar to the floor plan of a home, this shows us everything laid out in entirety with all the pertinent spacial information except for one; height. This missing aspect is addressed in the next plate:

The Section view of the set for Little Shop of Horrors

The Section view of the set for Little Shop of Horrors

In this cut, we take that same giant knife and slice it through the whole theatre and set vertically this time, using the center line as our cutting line. Again, everything the knife actually cut through is hatched, and all other pieces are filled and lined according to position from that cut. Once you have shown these two big picture views, everything else you put in the packet is breaking down each piece of the scenery into a variance of the same views. Now, because I’m not a certain flavor of crazy, I will not subject you to the entirety of the packet for this show. However, let’s zoom in on one element and look at the plates to show how I wanted it to look. In case you couldn’t guess which element….

Close up of the ground plan of florist shop in Little Shop of Horrors

Close up of the ground plan of florist shop in Little Shop of Horrors

Indeed, what would this show be without the florist shop in some form right? For our show, we made it the dominant unit in the set for obvious reasons. Considering how much action this puppy had to hold, it took a couple plates to describe it.

Plate showing the Front, Plan, Section, and Details of the florist shop in Little Shop of Horrors

Plate showing the Front, Plan, Section, and Details of the florist shop in Little Shop of Horrors

Plate shows the front facade of the shop that would have flown in and out during the show, closing and opening the shop as needed

Plate shows the front facade of the shop that would have flown in and out during the show, closing and opening the shop as needed

The two plates shown above are examples of showing how an element is supposed to look. The views given help illustrate the necessary details. If there are things that might clutter the object if drawn, or might be unclear in that form, that’s where you put in the notes. The notes are an elegant and delightful way to illuminate the drawing with further detail without overcomplicating the drawing itself. Obviously notes can get out of control, but half the dance in the drafting is how you choose to arrange things. How everything aligns on the page matters. Where you put the notes within the drawing means something. The way you arrange your thoughts on the page will make the difference between your colleagues being able to read and understand your meaning efficiently and accurately, or being utterly baffled and needing you to constantly re-explain what you meant.

Now, for the final thing that drafting can do that is vital; showing how certain moves and shifts are supposed to work. In the case of Little Shop there were two major shifts. The first is when we go from the shop to the dentist office, which involved the shop tracking offstage and the elements of the dentist unit being moved on….

Dentist Office Shift Plan

Dentist Office Shift Plan

This is a transition that would have been fully visible to the audience. The shop moving away reveals the silhouette of the city skyline in the far upstage, and the few elements that make up the dentist “office” (you’ll see the reason for the quotes when I show you the elevation of the elements in a later post) move into the space.

The other major transition in the show would have been completely invisible to the audience. It’s funny, but it’s probably the thing I am most proud of in this design, and it would have been something completely imperceptible to those seeing the show. We discussed this transition a lot on Squad Pod #1: A Chat with Team Puppetry; it’s the one where we load the largest of the four puppets into the shop for Act 2.

The Shift Plan for moving in Audrey 2.4 during intermission

The Shift Plan for moving in Audrey 2.4 during intermission

See, the secret to this whole thing lay in one really smart choice that Will (one of the puppet designers) made in cahoots with Ed (department technical director and agreed to help in fabricating some of the framework for the largest puppet); that the puppet could store in pieces and then be put together in the final position. Thus, I was able to use just a couple sneaky secret doors that looked like walls when in audience sight, but could open with the front facade of the shop in place (blocking audience view) to allow for the puppet pieces to be brought into the shop for assembly.

Closeup of the Shift Plan

Closeup of the Shift Plan

The hidden door in the mid stage unit would have swung downstage and been treated to look like a plywood construction barrier, masking the puppet’s movement up into the shop. The upstage wall of the workroom in the shop could swing upstage, allowing the puppet into the shop; a shade pulled across the facade window hiding everything from the audience.

I won’t pretend that I’m the most accomplished draftswoman. I definitely have much to refine and further perfect in how I communicate in this part of the process. However, I’m proud of this work. I made every effort to be clear, neat, and thorough. I came into graduate school with barely enough confidence to draft a box in Vectorworks, let alone a set with multiple moving pieces. It’s one of the things that I desperately wanted to improve while I was in school, and I achieved that goal. Again, much still to learn and explore, but Little Shop was a perfect show to test me in this facet especially. I feel confident that I rose to the challenge.

Squad Pod: #4 Team Lighting Design by Kristen Zarabozo

Photo of an early color model lit by Sam

Photo of an early color model lit by Sam

The second recording for Assistant and ME is mostly the sign-off because my internet shut off and I had to find my way back into the Zoom. Thus, two recordings because I’m not fancy and didn’t splice them together like the cool kids.

And in this Squad Pod update, Team Lighting!! I had the pleasure of sitting down with Sam (lighting designer for Little Shop) as well as his assistant Kelly and the master electrician Jacob. I had a wonderful time chatting with this bunch of talented artists and I have no doubt you will be as charmed and delighted by them as me.

Sam is going into his third year at UConn, and at the time of Little Shop he was a second year. In the time since he came to the university, he and I developed a solid collaborative rhythm. The first show we worked on was Henry IV: Parts 1 and 2 which was the last show in the 2018-19 regular season at CRT. Sam and I found that we really enjoyed collaborating together, and he turned me on to some summer opportunities where we got a chance to work together again. I could not have been more pleased that he was assigned to Little Shop because having that established collaborative trust with the lighting designer is huge. I say it in the interview and I will emphasize here; lighting designers are instrumental in determining how you perceive everything onstage. You can work as hard as you want on making the physical elements look a certain way with treatments. However, it’s the way the light interacts with that element that is actually going to determine how the eye actually interprets the information. This is why a good working relationship with the lighting designer is key.

Sam and I had the chance to communicate a lot during the development of the scenery, and especially with Little Shop, that was so crucial considering how much lighting was integrated into the set through practicals and other additions. Sam and I have styles that tend to compliment each other; we both like bold graphic choices with a strong emphasis on color choice and layering. He has a way of using light to emphasize or soften details within the world and I think I subconsciously respond to that by trying to make sure the pieces onstage have depth and detail that he can play with. Alas, Little Shop didn’t get to the point where Sam really got to let loose and play. I hope he gets another crack at Little Shop in the future; who knows, maybe we’ll get to see it through on the same production. Obviously I have a lot of professional respect for this person, and I would highly encourage you to check out his well fed portfolio and body of work at SJB Lighting Design.

Lighting Designer in the wild

Lighting Designer in the wild

Early color model lit by Sam, scene is for the song “Skid Row”

Early color model lit by Sam, scene is for the song “Skid Row”

Early color model lit by Sam (yes we like blue it’s a great color!)

Early color model lit by Sam (yes we like blue it’s a great color!)

A stage shot from Henry IV: Parts 1&2, we utilized the lighting fixtures as part of the built world, combined with large fabric elements and prop pieces. We had so much fun with this.

A stage shot from Henry IV: Parts 1&2, we utilized the lighting fixtures as part of the built world, combined with large fabric elements and prop pieces. We had so much fun with this.

Henry IV: 1&2

Henry IV: 1&2

A shot from Matilda which Sam and I worked together on this past summer

A shot from Matilda which Sam and I worked together on this past summer

Another shot from Matilda

Another shot from Matilda


The next chat is with one of Sam’s assistants, Kelly, and the master electrician Jacob. I wanted to talk to both of these individuals not only because they’re lovely people, but I think the things they do to further the process often goes under the radar. Despite the fact that we didn’t get to production, the role these two were going to play in that process was key, and I wanted to take the opportunity to highlight that. Both of these individuals are really cool people and excellent artists. I’ve had the pleasure of working with Kelly in the paint shop for the last few years, and she is certainly a person of many talents who easily moves back and forth between lighting and scenery with ease. Jacob is also similar in that regard. I had the joy of getting to share lab space with him for a year, as well as taking multiple scenic design classes which he also took. Having seen his work there and enjoying his company on many group excursions to see outside performances (from Broadway, to CT, to Boston!), I can say with confidence that he’s a fantastic individual and I can’t wait to work with him further in the future. Please take a moment to check out their work; Kelly’s is at kdaineault00 and Jacob is at Jacob-sikorski.com

Assistant Lighting Designer, Kelly

Assistant Lighting Designer, Kelly

Since I unfortunately don’t have a picture of Kelly and I for Little Shop, thought I’d share some fun shots of us working on this ridiculous and beautiful drop that we helped paint for CRT’s production of The Mystery of Edwin Drood (design of the dr…

Since I unfortunately don’t have a picture of Kelly and I for Little Shop, thought I’d share some fun shots of us working on this ridiculous and beautiful drop that we helped paint for CRT’s production of The Mystery of Edwin Drood (design of the drop by Alexander Woodward (scenic designer) and shop managed by charge artist Daniela Weiser).


A zoom out of the drop in progress (Kelly is the seated figure on the left)

A zoom out of the drop in progress (Kelly is the seated figure on the left)

Pic of the final drop. Kelly definitely put in a lot of hours on this bad boy.

Pic of the final drop. Kelly definitely put in a lot of hours on this bad boy.

Master Electrician, Jacob

Master Electrician, Jacob

Again, I’m afraid I don’t have pictures of work we’ve done together, but Jacob and I definitely saw some awesome theatre together. He’s always game for a theatre adventure. This is from when a group of us went to see The Sound Inside on Broadway.

Again, I’m afraid I don’t have pictures of work we’ve done together, but Jacob and I definitely saw some awesome theatre together. He’s always game for a theatre adventure. This is from when a group of us went to see The Sound Inside on Broadway.

Lots of fun friends from the Little Shop crew in this pic!! This is when we went to see On the Grounds of Belonging when is was at the Longwharf theatre.

Lots of fun friends from the Little Shop crew in this pic!! This is when we went to see On the Grounds of Belonging when is was at the Longwharf theatre.

And look at all the Little Shop all stars here again! This is when we went to see a production of Rocky Horror Picture Show out in MA (Sam was the lighting designer for that production as well)

And look at all the Little Shop all stars here again! This is when we went to see a production of Rocky Horror Picture Show out in MA (Sam was the lighting designer for that production as well)


Disclaimers Clarifications and Corrections: This audio is all recorded in one take over Zoom with no editing. Thus, the sound quality is about what you’d expect in that circumstance, so I’d ask that you listen with that in mind. In Sam’s chat, I make specific mention of my personal feelings about the show Carousel. I used that show as an example not because I think everyone shares my opinion on the matter, but because I personally struggle with my thoughts on that show and was sharing from that vantage. This is a chat between a couple colleagues and shouldn’t be interpreted as declarative on anything as the “only right” way of perceiving the world and our craft.

Outtakes: To the One's Who Bring it To Life by Kristen Zarabozo

Alex Campbell and Bryan Mittelstadt (who would have played Audrey and Seymour in our production of Little Shop) singing Suddenly Seymour in tribute to what would have been opening night of our show

If you listened to the last Squad Pod, you will have heard us talking about another sector of collaborators that are obviously very crucial to the work: actors. Chatting with Jess and Brittny about how closely costumes works with actors as apart of their process, I couldn’t help but feel a smile spread its way across my heart along with the now familiar sadness. As the scenic designer for Little Shop, I got lucky; I got to do a huge portion of work that I can effectively showcase using digital mediums. For our actors, they barely got through a few rehearsals before they had to halt. I couldn’t get through talking about my work on this show without also telling you, my persistent reader, about the actors I have been blessed to work with in my time at UConn.

See, at first I thought I would only highlight those who were cast in Little Shop, but I kept thinking about all the actors I’ve worked with in the department in the last three years; or seen them in shows as a delighted audience member. The creative team definitely works themselves down to the bone and marrow, and one of the singular joys that makes that worth while is the moment the actor enters into our work and animates it. The second an actor stands on a chair I’ve placed, or leans against a wall like they’ve lived in that space for years….I can’t actually articulate how it ties my chest into knots of wonder. I got lucky in my program; the actors I worked with cared deeply about the work and generously endowed mine with great animation. So, I want to feature them all here, at least, those who are graduating. We all had our final shows and showcases COVID canceled, but we did the work. I hope you take a moment to go look at theirs as you have been so generous to read (and listen) about mine

First, the MFA actors. These people hold a special place in my heart because we all came in at the same time and are graduating at the same time. UConn recruits the MFA actors every three years, so this group happened to be at the top of a recruitment bunch when I entered UConn. I have worked with every single person in this group, count a few as close friends, and all as colleagues. The link below the picture is to their showcase website, which has everyone’s individual website listed. Please, take a moment to explore this talent, I am definitely going to miss working with this crew on a regular basis. All the best to you loves, you’re gonna be amazing!

87097870_10157312726741378_1523826741326381056_o.jpg

UCONN MFA Actors

Next, we have the senior BFA Acting class. Now, while I haven’t worked with every single person in this class, I have had the pleasure of witnessing them in a production as an audience member. Both as collaborators and performers, I have found this group to be generous and daring in their work, as well as gracious in their communication. Their energy is a force to be reckoned with and I look forward to the day that I know will come (especially given how small our industry is) when I can say I have worked with every single one of these individuals. Go take the world comrades!

UConn BFA Actors, 2020 Class

UConn BFA Actors, 2020 Class

Squad Pod: #3 Team Costume Design by Kristen Zarabozo

My fave pic of the three of us, no competition

My fave pic of the three of us, no competition

In this edition of Squad Pod, it is pleasure beyond describing to post audio of chats with two of my favorite people on this planet! The first chat is with costume designer for Little Shop of Horrors, Jessica Haswell. The second chat is with Brittny Mahan, who was the assistant costume designer on the show.

These two women have been instrumental peers in my time in grad school. We came in at the same time, along with our fellow colleague Toni Sterling (who’s a killer lighting designer!) three years ago. While we formed so many relationships with the rest of our peers, there is certainly something powerful about being running mates from the beginning. I think Jess and Brittny are incredible artists. I’m also blessed to know them as friends as well as colleagues, which has made working together even more of a joy.

Jess and I had actually worked together on a CRT show the previous season (Henry IV: Parts 1 and 2.) We also spent plenty of time together in our little corner of the lab, choosing to share our working space after our first year. If there is one thing that makes my chest tight when I think about the show’s cancelation, it’ the fact that we didn’t get a chance to see Jess’s costumes alive and beautiful, worn by our incredible cast. While her renderings are certainly gorgeous and definitely give you a clear idea on what her design would be, I would be lying if I didn’t also say that I’m still a little sad when thinking about how awesome they were going to be on the body. Like me, this was her MFA Project, so it did sting a little extra for us to have our last piece as grad students stopped before production. Still, chatting with Jess about her process was a joy and delight and I hope the selection of renderings shown here can give you a taste of just how talented she is. Definitely check out her website jessicahaswelldesign.com

Disclaimers, Corrections, Clarifications: As with the other episodes, we are just two artists chatting about our work and life. Anything we say is often based in opinion and our own experience and therefore nothing should be taken as a firm declarative of the “only right” or anything of that sort.

A little blurry, but I really love this picture of us!

A little blurry, but I really love this picture of us!

Looks for Ya Never Know (Seymour and Do-Op Girls)

Looks for Ya Never Know (Seymour and Do-Op Girls)

The Do-Op Girls, look for Closed for Renovation

The Do-Op Girls, look for Closed for Renovation

Call Back in the Morning and Meek Shall Inherit

Call Back in the Morning and Meek Shall Inherit

Super fun amazing sparkly fabric Jess was looking to use for the look in the rendering directly above

Super fun amazing sparkly fabric Jess was looking to use for the look in the rendering directly above

Subsequent to the Events You Just Witnessed

Subsequent to the Events You Just Witnessed

Look 2 for the three principles

Look 2 for the three principles

Audrey and Orin

Audrey and Orin

Act 2 Beginning Look for three principles

Act 2 Beginning Look for three principles

Sominex

Sominex

Don’t Feed the Plants

Don’t Feed the Plants

Next audio we have is a chat with the indomitable Brittny Mahan, who was acting as Jess’s assistant on this show. She has also designed multiple shows at CRT (Crucible, Mystery of Edwin Drood, and Shakespeare In Love) and she is pretty much a rockstar human on every level. Definitely check out her website as well, you will never be sorry that you worked with this woman www.brittnymahan.com.


Disclaimers, Corrections, Clarifications: Again, we are just chatting about our work and our field. At one point, we do get a little into it about payment and monetary compensation for work in the professional world, and we did make a point to say we don’t get paid hourly. To be clear, assistants are often paid by the hour, we were mostly referencing designer compensation in that moment. Further to that point, we are not necessarily advocating that everything shift to hourly measures for compensation; rather that the level of work and skill that designers bring to the production should be appropriately compensated financially. This is particularly poignant for costume designers especially who have, anecdotally and historically speaking, often received the lowest pay on the creative team.

On this Episode of KP Gaffes: At one point in the recording, I say that a certain amount of time Brittny mentions is “less than a month,” when in fact the time frame she relates is a little over a month. Time is really screwy in grad school, warps the mind I swear.

Fab pic of us at the Prague Quadrennial last year

Fab pic of us at the Prague Quadrennial last year

Since work stopped before we could get pictures of how Brittny’s assistance contributed to build for Little Shop, I wanted to include a couple pictures from another CRT show. This is Mystery of Edwin Drood, for which she was the costume designer

Since work stopped before we could get pictures of how Brittny’s assistance contributed to build for Little Shop, I wanted to include a couple pictures from another CRT show. This is Mystery of Edwin Drood, for which she was the costume designer


Another shot from CRT’s Mystery of Edwin Drood

Another shot from CRT’s Mystery of Edwin Drood

Okay, now just standby for the love fest. I’m going to miss seeing these ladies all the time as I have become accustomed. Our industry is very small, so we shall certainly cross paths again. Still, I’m going to miss this loves, you were huge part of a very involved three years. We did it!!

Costume designers abroad!

Costume designers abroad!

I had to include this one, the drama is just perfect!

I had to include this one, the drama is just perfect!

We decided that if for some reason we ever release an album, this is def the cover

We decided that if for some reason we ever release an album, this is def the cover

My heart to you both, you made these three years amazing!!

My heart to you both, you made these three years amazing!!


Episode 5: The White Model by Kristen Zarabozo

Actual picture of me in my natural model making state without assistants

Actual picture of me in my natural model making state without assistants

So we start getting into the rock stars of the scenic design world: the model. Models are obviously not only limited to the realm of scenic design, but they are an essential tool for communicating and (in a way) proving a design. They are the closest you can get to actually test driving how everything is going to look in real time. As has been told to me many times, “We work in a three dimensional art form and so we should be showing our designs through a three dimensional medium.”

There are many advantages to a physical model. You are creating a tool that can accurately inform you down to the inch if what you are thinking is even going to fit, let alone look good in the space. To put something “in scale” means simply that we can shrink the whole world down by logical proportions to a size that we can put in a box and carry around (although admittedly some scale sized models are still enormous relatively speaking). You take increments of measurement (in the case of America increments of the inch while the rest of the world calmly goes about using metric increments) and simply make it equal to 1 foot in real life. For show models, I tend to work in 1/4”=1’-0” scale. While still tiny (think about it, a person measuring 6’ in real life is only an inch and a half tall in scale), you can get enough detail to communicate the idea while still keeping the whole model relatively manageable in size.

The model is an excellent communication tool, especially for the director. While a ground plan drafted out can be helpful, the model really conveys the whole meaning and consequences of each piece in in the actual space, in all the planes that matter to the performance (i.e. three dimensions). It’s all about the idea of “show don’t tell.” Words are very easy to confuse or misinterpret, but if you can pick up a piece and move it around in the actual space in this tiny world, that gets everyone a lot closer to being on the same page about what the design is shaping into.

White models are a kind of first draft of the space, some designers will even refer to them as “sketch models.” The process is similar to a sketch in the sense that you are trying to rough out ideas and just get something down on the page; only with the model it’s inside a scale replica of the theatre. Despite this designation, white models can be as simple or complicated as desired. They are called white models because they are often made out of white paper materials and don’t have color applied. Some are truly just the simplest shapes while others are works of art showing off all the architectural buildups and detail. However, the usual point of a white model is to get the basic gesture of the set, possibly starting to play with texture and smaller details.

My process isn’t terribly unique for a number of designers working in the industry at present. For models, I tend to draft the pieces in a computer program that I can then print out to cut and install. I happen to work out of Vectorworks, but that’s more a matter of comfort for me personally than any specific advantage the program offers. Drafting things in the computer is a marvelous modern wonder that I’m not embarrassed to admit still amazes me. I can make the piece with absolute accuracy and then reproduce it swiftly and, again, accurately, as many times as I wish. And trust me, for a model, that is crucial.

I make what’s called a model kit. This simply means that I draft the pieces so that they are a flat version of the object that can be built up during the install. Think about a four legged table; now, pretend you smashed that table flat and then fly directly overhead and look down. You would see the table top, and then the four legs sticking directly out from each side. That is what you are trying to draft for each piece, a smashed flat, or disassembled version that can be printed on a flat piece of card stock and then folded or built back into its 3 dimensional form.

Example of White Model Kit for Little Shop

Example of White Model Kit for Little Shop

Example 2 of White Model Kit for Little Shop

Example 2 of White Model Kit for Little Shop

From these kits, my assistants and I build up the pieces for the model and then install them in the box. Little Shop was a show that saw many incarnations of the white model from the most basic, to the inclusion of buildups and textures. I started exploring this show initially under the idea that the shop could turn a full 360 degrees, stopping on the front view or the back depending on the scene. The white models were mostly built exploring this version of the shop in the space.

The only surviving picture of the very first fully assembled white model made for this show. Truly a “sketch” model.

The only surviving picture of the very first fully assembled white model made for this show. Truly a “sketch” model.

First model version pieces

First model version pieces

Tape for scale

Tape for scale

That rectangle on the floor is totally an accurate representation for Audrey 2 (definitely not true, we will get there in a later post).

That rectangle on the floor is totally an accurate representation for Audrey 2 (definitely not true, we will get there in a later post).

Next Version, White Model 2.0

Next Version, White Model 2.0

Interior of Shop 2.0

Interior of Shop 2.0

Up close and Personal with Shop 2.0

Up close and Personal with Shop 2.0

White Model 3.0, getting in a little texture and detail to start seeing how that reads

White Model 3.0, getting in a little texture and detail to start seeing how that reads

White Model 3.0 shop interior

White Model 3.0 shop interior

Oh yeah, and we have a dentist!!

Oh yeah, and we have a dentist!!

Some 3.0 Pieces

Some 3.0 Pieces

Shop 3.0

Shop 3.0

Upstage surrounding pieces for model 3.0

Upstage surrounding pieces for model 3.0

Splay wall pieces for model 3.0

Splay wall pieces for model 3.0

Exhibit of White Model pieces….or at least what made it through the great sudden studio clean out and move out of COVID19

Exhibit of White Model pieces….or at least what made it through the great sudden studio clean out and move out of COVID19

While lacking in some of the more fleshed out details, white models are an awesome way to start communicating the broad ideas of the world before investing too deeply in details. Again, I’m always in collaboration with my director, and I find that if I can start with showing broad strokes, then my conversations about those structures with the director will really start to clarify the details. I like to try and develop models that make clear my thoughts and ideas, but still provide a lot of flexibility for us to tease and tweak, moving forward together with ideas that will serve the aesthetic and the performance. White models are just another tool for successful collaboration, a way to shift forward towards a more detailed color model as the process continues.

Squad Pod: #2 A Chat with Assistant Scenic Designers (Little Shop of Horrors) by Kristen Zarabozo

Duration: 40 Min (wish)

Duration: 11 MIN (ish)

Today is a bit of a sad day considering today would have been opening night for Little Shop of Horrors. Most days I’m at peace with events, but today feels a little more gray and upsetting. Thus, I’m partly processing that sadness with a special double feature of Squad Pod. Standby for copious amounts of gushing.

Today I feature my two incredible assistants, Amber Meadows and Ray Dondero. I don’t think I can possibly convey just how incredible these two women are as people, and how much they did to make this process a success. Assistants are absolutely the unsung ninja heroes of the design community. While the designer is busy producing content and determining how things are going to work, the assistants are a whirlwind of skilled activity producing the materials that showcase the designer’s thoughts. In my own work, I tend to load my assistants with a lot of model building and keeping after the administration on the props.

The first chat posted is with my Lead Assistant (/Associate/Lifesaver/ Boss Sprout) Amber Meadows. Truly, this woman is a marvel, and a recent friendship has grown deep and fast between us. If there is one person I knew I could rely on with full confidence and no reservation, it’s Amber. She is a first year grad student, an incredibly gifted artist, and wonderful friend. Check out her website at ambermeadowsdesign , she is going places!

IMG_8187-2-2.jpg
Fave Pic of Amber and myself

Fave Pic of Amber and myself

Early Version of the Shop Built by Amber (Exterior)

Early Version of the Shop Built by Amber (Exterior)

Early Version of the Shop Built by Amber (Interior)

Early Version of the Shop Built by Amber (Interior)

Closeup of Dentist Office Unit/ Unit and Chair kitted and built by Amber

Closeup of Dentist Office Unit/ Unit and Chair kitted and built by Amber

Closeup of Final Shop/ Shop, and many of those tiny little bitty pieces were built/colored/painted/applied with very careful tweezer work by Amber

Closeup of Final Shop/ Shop, and many of those tiny little bitty pieces were built/colored/painted/applied with very careful tweezer work by Amber

Disclaimers, Clarifications, and Corrections: These recordings are done as informal and unedited chats among friends and colleagues and therefore there are various sound quality issues that one would expect with an amateur recording (i.e. sound garble, having to stop and start because neighbors are loud etc.). Also, we carried out all model making tasks for this project SAFELY AND WITHOUT INCIDENT. Amber and I definitely make light of past mistakes where we had minor mishaps with our Exacto knives, but that was not the case in this process.

In this Episode of KP Gaffe/s: You all are now aural witnesses of one of the strangest crossed wires in my brain; every time I try to reference the movie Spinal Tap I always say Full Metal Jacket instead. I know this makes absolutely no sense whatsoever; they are two movies completely void of any similarity to each other that would excuse the mixup. Still, it happens to me every single time I try and say it and I have no explanation. So enjoy one of the many strange quirks that can come out in a conversation with me.

The next recording is a chat with my second assistant, Ray Dondero (/Superhero/Ninja Sprout). Ray and I go way back by school standards because she had been my assistant on the show right before Little Shop. That show was Wolves and we made a really fantastic team. Ray is junior working towards her BFA and she is lightening quick with everything I throw at her. Model work iss always accomplished cleanly and with care, and she did a lot of the leg work with props on both shows. Keep in mind that the props book she put together for Little Shop was a little over 60 pages and that was on top of other projects I gave her. She also accomplished some beautiful mockups of initial set dressing ideas in photoshop using early model photos. Working with Ray on my team was just as fantastic as the first time around and I highly recommend checking out her website raydondero and keeping an eye out for her on the scene as well!

image000000.jpg
A shot of me and my lovely assistant from the opening night of our first show working together Wolves

A shot of me and my lovely assistant from the opening night of our first show working together Wolves

Early Dentist Unit/ Unit and Lamp built by Ray

Early Dentist Unit/ Unit and Lamp built by Ray

Set Dressing Mockup/ Model staged by Ray and then she used Photoshop to place in other details and labels

Set Dressing Mockup/ Model staged by Ray and then she used Photoshop to place in other details and labels

Set Dressing Mockup for Act 2/ Ray used the same process described in the previous caption

Set Dressing Mockup for Act 2/ Ray used the same process described in the previous caption

Disclaimers, Clarifications, and Corrections: Aside from reiterating the earlier disclaimers, keep in mind that this particular chat was the very first recording I made. There is definitely an element of me being a little fumbly. I want to thank Ray for her enduring patience and kindness, and being willing to play the guinea pig for this part of the project.

Squad Pod: #1 A Chat with Puppetry by Kristen Zarabozo

Duration: 1 HR 2MIN

It is my distinct pleasure to introduce another facet of my showcase for the COVID-canceled production of Little Shop of Horrors, that would have been opening tomorrow April 24th 2020 at the Harriet S. Jorgensen Theatre presented by the Connecticut Repertory Theatre. I have discussed in previous posts that the team on this project was exceptional (at least in my humble opinion). I introduced you to the team in the post Episode 2: Meet the Squad, but I really wanted for others to actually hear from them. So, I’m recording conversations with various members of the creative team and I am posting that audio under the title Squad Pod. On this inaugural episode of Squad Pod I thought it only fitting to start with the puppetry team who was responsible for the design and performance of the many puppets created to make up the character of Audrey 2. I had a really good time chatting with these two incredible artists and I can’t wait to have another project in the future where we can play together again!!!

****IN ADDITION: If you are viewing this post today (April 23rd) before 7PM EST, definitely check out the interview that Will and Rob (puppet designers for our Little Shop) are doing with Martin Robinson who is the puppet artist who designed the original puppets for Little Shop of Horrors. You can find this interview on the Facebook Page for The Ballard Institute and Museum of Puppetry. If you are reading this after April 23rd, then hopefully the link will take you to the video of the interview to enjoy!

Disclaimers, Corrections, and Clarifications

General Disclaimers: This audio is by no means professionally recorded. These are unedited conversations carried out over Zoom in one take; thus there are the various sound quality issues you might anticipate (i.e. faulty internet connections, internal computer microphones etc.). Also, these episodes are conducted as an informal discussion among friends and colleagues, therefore they are comprised mostly of opinion based on recollection and not to be misconstrued as declarative finalities (in other words, we’re just chatting and talking about how we feel about our work. We are by no means trying to come off as the “only right” on any topic we cover).

Clarifications and Corrections: During the chat I identify Ed Weingart as the “technical director.” To be clear, Ed is the Assistant Professor of Technical Direction and departmental Technical Director. Kimberly Kinan is the second year MFA candidate in technical direction who was assigned as the Technical Director to this production of Little Shop of Horrors. Ed is her mentor and he also agreed to take on assisting the puppet designers specifically with fabricating the mechanism structure for the pod portion of the largest version of Audrey 2.4.

This Episode’s KP gaffe/s: I really do know who Howard Ashman is everyone, I swear it’s just the isolation fumes getting to my brain. Also, the random measurements I throw out concerning the Jorgensen are guesses that I am making wildly without checking back at my drafting. This is why I need models and my drafting, girl cannot remember everything off the cuff.

And now for a fun stroll down the progress photos Will would send me while he was working. These always made my day so much better, and I hope they do the same for you now:

Early Model of Audrey 2 Possibility

Early Model of Audrey 2 Possibility

Puppet 1 Progress

Puppet 1 Progress

Finished Puppet 1

Finished Puppet 1

Puppet 2 in Progress

Puppet 2 in Progress

Puppet 2 Further Progress

Puppet 2 Further Progress

Finished Puppet 2

Finished Puppet 2

Puppet 3 Progress

Puppet 3 Progress

Puppet 3 Further Progress

Puppet 3 Further Progress

And that’s all I got folks! Tune in to the rest of the showcase for the final model photos that have a mini version of what Puppet 3 roughly might have looked like finished!

And that’s all I got folks! Tune in to the rest of the showcase for the final model photos that have a mini version of what Puppet 3 roughly might have looked like finished!

Episode 4: The Sketch by Kristen Zarabozo

How I feel when I’m sketching….reality often looks a lot more like a hunched Gollem creature muttering to itself with hands covered in graphite and eraser shavings falling out of the hair. Oh well, this is how I feel on the inside.

How I feel when I’m sketching….reality often looks a lot more like a hunched Gollem creature muttering to itself with hands covered in graphite and eraser shavings falling out of the hair. Oh well, this is how I feel on the inside.

There is something that feels almost secret and wonderful about the joy of a sketch. The digital world has opened up an incredible wealth of tools that has allowed for so much accessibility for people to express themselves artistically. Digital mediums are a wonder and I delight in having such things at my disposal to use in my own work. All that being said, the secret delight (although I know that it’s not so very secret really) of the sketch is that it is simply accomplished with very mundane tools; pencil and paper. There is something inherently thrilling about looking at the strokes of someone’s pencil, seeing the way they capture things in their scratches and eraser marks. Truly, a sketch is a wonderful thing.

Now that I’m done waxing rhapsodic on this particular subject, let me get real; the sketch is a useful tool in some respects, but it definitely is a fluid and interpretive piece of information. In the case of a scenic design, a sketch can lie in certain ways. It’s often capturing only a very rudimentary view of the scenery (everyone is always sitting in perfect sight lines right?) , and scale is relative at best. A sketch allows a vast degree of squeezing and scraping and tweaking of perspective that isn’t always in compliance with the laws that govern reality. Compared with the granular accuracy that can be achieved with an in scale live model, or even a 3D rendering in a computer program, it’s a wonder that a sketch is still utilized at all.

Despite all this, I know that for me personally a physical pencil sketch will always be useful. I’ve had some kind of drawing thing in my hand since I was little. Too many things inside, had to get them out and fixed in stillness somehow. It’s still very much like that. After the research, I have to order the vast ecosystem of ideas into some semblance of stillness that will even stand a chance of making sense to a director, and even to myself. Before I can move into a ground plan or model, I have to order objects loosely, investigating if they even make basic sense in a sketch.

Think of the process like steps in the recipe; you don’t just take the raw ingredients, throw them in the oven and expect to get a cake. You need to go through the procedure. Every recipe makes a different treat, but all treats require similar steps of somehow combining raw ingredients together to create something different than the original. The sketch for me is the combining of the raw ingredients of the research and mixing them into the base batter/dough of my design. I can take a quick taste from that batter (you all do it, smile in solidarity and don’t judge) and tell if I need another dash of this or that before putting it in the oven. The sketch is the first taste test to show the director. Sometimes, you make multiple and you pick the one you like best. In this case, I drafted one set of sketches because I knew that we had to shift pretty quickly into the model.

Sometimes, the sketch can be pretty loose to start, only a rough gesture vaguely larger than thumbnail. I may occasionally show this type of sketch to a director depending on the situation, but often this type is reserved FDEO (For Designer Eyes Only)

Example of a loose sketch that I did for Act 4 of The Seagull

Example of a loose sketch that I did for Act 4 of The Seagull

In the case of Little Shop, we went with a slightly more formalized process.

My sketch process is actually a hybrid of analog and digital. I start with a picture of the model box of the theatre with a scale figure and usually a piece of model furniture. This will help me establish a scale relative to the human figure (usually made at 6ft. tall because, you know, basically most humans are that height…..sure) and the model piece will help me establish my horizon line so I can keep my perspective (fairly, mostly, it’s chill) accurate.

I do a main sketch on trace paper by hand over this picture of the box; keeps everything within relative proportions. I then create multiple trace paper sketch layers of different set pieces that move in and out of that main sketch.

Base picture of my model box for the Jorgensen Theatre that I will trace over to establish fairly accurate proportions for the sketch.

Base picture of my model box for the Jorgensen Theatre that I will trace over to establish fairly accurate proportions for the sketch.

Main Base Sketch for Little Shop, Skid Row envelope (pre-final Photoshop)

Main Base Sketch for Little Shop, Skid Row envelope (pre-final Photoshop)

Shop Exterior sketch layer (pre-final Photoshop)

Shop Exterior sketch layer (pre-final Photoshop)

Shop Interior Sketch Layer (pre-final Photoshop)

Shop Interior Sketch Layer (pre-final Photoshop)

At this point, I scan all the pieces into the computer and then begins the Photoshop magic. I won’t pretend I’m a marvelous expert in the world of all things Photoshop. However, I use the ten tools I do know to excellent advantage. I’m a mixed media girl at heart. I always say that you should use the best medium for the thing you’re trying to communicate. The basic forms and shading of my scenery is best communicated through analog materials of pencils and marker and then digital tools are remarkably good at emphasizing what is important about those forms in a format that reads beautifully across multiple platforms. I am often sending this information to my director and team digitally, so it is imperative that I do everything possible to ensure that my work is clear and effective when being seen that way.

In this, the sketch is wonderful because I can place the viewer exactly where I want. Sometimes photographing a model can get tricky because I can’t always get the camera exactly where is most ideal. In a sketch, I have full control over the viewpoint and that is a huge advantage, especially at the early stage.

For Little Shop, I built three sketches; the base envelop of Skid Row, the shop front, and the shop interior.

Final Sketch for Skid Row

Final Sketch for Skid Row

Final Sketch Exterior

Final Sketch Exterior

Final Sketch Shop Interior

Final Sketch Shop Interior

I had a lot of fun building these. The sketch is one of my favorite parts in the process because it gets at all my favorite things about the way I make art; pencil to paper, mixed media, and then building composite collages of the pieces to make something new. The sketch does have its limits, but it’s crucial and dear to me in both my professional and personal artwork. I mean, come on, who doesn’t love a sweet little drawing?

Episode 3 (Part 2): My Own Research for Little Shop by Kristen Zarabozo

My personal research process in 2020 (obviously I started this project in 2019, but semantics) usually starts with a Pinterest dive. Please don’t cringe! (that’s mostly for my mentor if he ever reads this, please give me a chance). Pinterest is a deep abyss of image overload and I find it useful for the initial “falling” as I like to call it. I just wind my way down, through, around, and I don’t sensor my impulses for a couple hours. I use it to generate hundreds of “sparks” or potential “paths.” I am not looking for a particular “door” at present, I am just running through as many as I can to see which will offer a working world.

After that first dive, I select things that sing together, that all appear to cohesively look like they belong together. Then, I try and source those images; is this from a certain artist? Can I search more of their work specifically? Did this one come from a book? Can I find that book in one of the many libraries I’m apart of? etc.

On the hunt for images, books are worth their weight in opals. Books are already collections of related things gathered together in a single place so you don’t have to go to the trouble of building from scratch (and funnily enough, a lot easier to make a citation for later in an MFA Project). Still, it can sometimes be tricky to find that perfect book. Even spending hours perusing our art section in the school library isn’t always fruitful; hence why something like the internet or Pinterest, which will sometimes list that book title or artist name to start can be magical.

But, I don’t just use images. I really love to understand the worlds we are trying to build. What is it about the 80’s in American cities that’s special? What actually is Skid Row? What did life look like for people like Audrey and Seymour in a city in that time? For myself, I read a number of articles, but I also respond to audio research. Specifically for this production, I listened to the podcast 99% Invisible’s episode titled Containment Plan. This episode was about the original Skid Row out in LA, and how the city and a group of activists came to an agreement that the Skid Row area (its residents and services) would be kept to a certain few blocks and not spill into the surrounding neighborhoods. This particular piece fascinated me because, while we were definitely going with a more East Coast NYC styled place, the whole idea of people being “contained” within this small piece of the city informed so much of how I wanted our Skid Row to feel.

I wandered the highways and byways of the internet, paged through articles about hostile architecture, listened to podcasts and ultimately, pictures began to emerge. If I were to show you the whole lot of images I initially flagged….well I’m not so no worries. Below, I have curated some of the best and the brightest, the ones that I kept coming back to over and over as the design progressed. They are divided into categories of Skid Row, the Shop, and the Dentist’s office.

Skid Row Research Collage 1

Skid Row Research Collage 1

Skid Row Research Collage 2

Skid Row Research Collage 2

Shop Research Collage

Shop Research Collage

Dentist Office Collage

Dentist Office Collage

I think it fair to disclose that I made these collages recently. They are compiled from images that I found initially in the first research pass, as well as those I collected along the way as various adjustments were made through collaboration. In case it didn’t read clearly throughout these posts, I love this phase. It’s a joy to go on the hunt for the exact visuals that give you the information you need to build the show. Especially in this present time where I am blessed beyond all measure with a wealth of information and resources that I have the privilege to access and utilize to further my art. Truly, what a wild time to be alive.

Episode 3 (Part 1): Research by Kristen Zarabozo

IMG_9080.jpeg

When you hear the word “research” it might bring to mind flipping through pages and pages of books and articles, grabbing paragraphs and sentences that you can appropriately cite in your bibliography of a very organized paper. Or perhaps you consider it more scientifically; running trials and experiments, gathering data to support your hypothesis.

For a designer, research is somewhat like that. Books are often involved and there is definitely a lot of reading. We are also on the hunt to gather data to prove a hypothesis; in this case, that a design thesis can work. However, we aren’t building a bibliography, but a planet. For the scenic designer, we are mostly looking for images that resonate with what we are thinking about for our “vision” of the play.

Think of each script kind of like that moment in the movie Monster’s Inc. where Sully, Mike, and Boo come through the conveyor belt and see thousands upon thousands of doors before them. Each script holds a multiverse of options, or doors, that the team can open and explore in order to communicate the story. Researching for the designer is the moment where we can gleefully open a whole bunch of doors and explore their possibilities, finding the paths that will ultimately serve our needs best for this project.

Image from the movie Monster’s Inc. (Disney and Pixar)

Image from the movie Monster’s Inc. (Disney and Pixar)

Now, it’s very important to understand that in American theatre the vision is very heavily influenced by one individual; the director. The relationship between director and designer is absolutely crucial for creating a cohesive design. For me, my focus is making sure that I am an ally to the director, that I am doing everything I can to listen to their wants and needs and then translate that into a design that will satisfy aesthetic and function.

In the case of Little Shop, Dexter was very clear about two things from the beginning:

-He wanted the show to be set in the 80’s

- He was very strongly inspired by B-Movies, particularly horror movies from that era. He also said he really liked the aesthetic and feel of the Netflix series Stranger Things.

80’s Horror Movie Poster Collage (not original to this post’s author)

80’s Horror Movie Poster Collage (not original to this post’s author)

Stranger Things Poster used for Universal’s Halloween Horror Nights (not original to this post’s author)

Stranger Things Poster used for Universal’s Halloween Horror Nights (not original to this post’s author)

So, now I toddle off my merry way to research. Not only is researching necessary for me to start moving my own thoughts on how things should look and feel, but this is the way I can start sharing language of the world with my director. It’s always an interesting dance because as a designer, I can see the world in so many potential pictures moving at a thousand miles an hour for every moment; endless possibilities and doors. For the director, they need a way to see what I’m seeing so they can decide if what I have to offer can work with how they want to move bodies in that space. We have to find a door into a world that works for all; so I look for images that accurately portray the paths I think might work, and then the director picks which one we will walk.

Episode 2: Meet the Squad (Code Name: The Creative Team) by Kristen Zarabozo

Every production consists of a team. For the most part, we are a shifting demographic of team members depending on the particular production. The portion of the team that is made up mainly of the director and designers is often referred to as the “creative team.” Obvs that word could and should extend to many practitioners in the making of a piece of theatre. However, for the sake of simplicity, all the individuals discussed in this post will be referred to collectively as the Creative Team. I’m including the technical director in this because she is also a fellow graduate student, and she definitely had a great deal of input that helped inform creative decisions. Similar reasoning led me to also include our master electrician. So, all readers of all ages, meet one of the best squads I have had the privilege of working with in my short career so far:

***A note about Code Names: These are entirely in my own mind and completely made up for my own brain paths. I never referred to/addressed these incredible artists by anything other than the name they preferred and I hope they don’t mind that I gave them all epic aliases in my own mind.

*** Another note: With the exception of our director and our sound designer, all the participants on this team are current students at UConn as of the writing of this post.

Director: DexterCode Name: The Captain

Director: Dexter

Code Name: The Captain


Team Scenic Design:

Scenic Designer: KPCode Name: Buckle Up ButtercupWebsite: KPEZ Designs// Instagram: @kpezdesign

Scenic Designer: KP

Code Name: Buckle Up Buttercup

Website: KPEZ Designs// Instagram: @kpezdesign

Lead Assistant/Associate: Amber MeadowsCode Name: Boss SproutInstagram: @ambermdwsdesign

Lead Assistant/Associate: Amber Meadows

Code Name: Boss Sprout

Instagram: @ambermdwsdesign

Assistant: RayCode Name: Ninja SproutWebsite: Ray Dondero

Assistant: Ray

Code Name: Ninja Sprout

Website: Ray Dondero


Team Puppetry:

Designer: WillCode Name: Dr. Frankenstein

Designer: Will

Code Name: Dr. Frankenstein


Audrey 2 Puppet Performer/Operator/Co-designer/ Dramaturg: RobCode Name: IT’s Alive!

Audrey 2 Puppet Performer/Operator/Co-designer/ Dramaturg: Rob

Code Name: IT’s Alive!


Team Costume:


Designer: JessCode Name: Princess of Making you Look ExcellentWebsite: Jessica Haswell Designs

Designer: Jess

Code Name: Princess of Making you Look Excellent

Website: Jessica Haswell Designs

Assistant: BrittnyCode Name: Mother of Good VibesWebsite: Brittny Mahan Costume Design

Assistant: Brittny

Code Name: Mother of Good Vibes

Website: Brittny Mahan Costume Design


Team Lighting:

Designer: SamCode Name: All Them Saturated ColorsWebsite: SJB Lighting Design

Designer: Sam

Code Name: All Them Saturated Colors

Website: SJB Lighting Design


Lead Assistant: ChandlerCode Name: Queen (Nuff Said)

Lead Assistant: Chandler

Code Name: Queen (Nuff Said)


Assistant: KellyCode Name: MagliteWebsite: Kelly Daigneault Portfolio

Assistant: Kelly

Code Name: Maglite

Website: Kelly Daigneault Portfolio


Master Electrician: JacobCode Name: Mighty MouseWebsite: Jacob Sikorski// Instagram: @sikorskidesign

Master Electrician: Jacob

Code Name: Mighty Mouse

Website: Jacob Sikorski// Instagram: @sikorskidesign

Team Sound:

Designer: HideCode Name: Rockstar**This picture is a poor substitute for the actual subject, but hope you enjoy anyway!

Designer: Hide

Code Name: Rockstar

**This picture is a poor substitute for the actual subject, but hope you enjoy anyway!


Associate in Charge of Content: MackCode Name: Classy CollectorSocial Media Info:Website: MLG Design// Instagram: @mlg__designs

Associate in Charge of Content: Mack

Code Name: Classy Collector

Social Media Info:

Website: MLG Design// Instagram: @mlg__designs

Associate in Charge of Systems: DanielCode Name: Wave Master**This picture is a poor substitute for the actual subject, but hope you enjoy anyway!

Associate in Charge of Systems: Daniel

Code Name: Wave Master

**This picture is a poor substitute for the actual subject, but hope you enjoy anyway!

Team Technical Direction:

Technical Director: KimberlyCode Name: Makes It Happen

Technical Director: Kimberly

Code Name: Makes It Happen


Assistant: GavinCode Name: The DashSocial Media Info:Instagram: @gav_bparker

Assistant: Gavin

Code Name: The Dash

Social Media Info:

Instagram: @gav_bparker

We spent many hours working together to make a show that was going to be an excellent ride. You will definitely hear more about and from the team as we continue forward. Everything about a good piece of theatre is rooted in good communication and teamwork. Couldn’t have asked to be apart of a better team for this project.


Outtakes: EF's Visit To a Small Planet by Kristen Zarabozo

Unknown-1.jpeg

In considering a script, there are the linear ways of interaction, and then there are the other ways to dance with the words. I first encountered this article when I was a freshman in college, and it rocked me. I know there are those who have their grievances with it (I hear that and totes understand/respect them as valid), but for me, I still find it really useful. This paper was the first thing that really blew my feeble expectations of analysis out the window and helped me rebuild with a more flexible filter. It’s a short article, will likely take you less time to read it than it does to read one of my posts. Hope you enjoy!

EF's Visit to a Small Planet

Episode 1: The Script by Kristen Zarabozo

“…a picture is worth a thousand words, make sure they’re the playwrights.”

Wendall Harrington

First page of text from my script of Little Shop

First page of text from my script of Little Shop

Words on a page, the first parameters for building a world.

Now, there are some fundamental tools of script analysis that most theatre artists are equipped to use regardless of focus. I’m not going to go through those here because this is a design-centric theatre tale. Suffice it to say, if you are interested in such things, do look up David Balls book Backwards and Forwards.

How do I personally go about script analysis specifically for design? Well, I go in with a foundational question: what do we need to tell the story? Some concrete things that I look for in every script to start helping flesh that answer are:

  • Stage Directions (***Please note, the stage directions are a little like the pirate’s code in that they are more like “guidelines.” Sometimes an estate or still living playwright will rigidly dictate that stage directions can’t be altered in any production. More often, however, one is allowed to treat them with a degree of discretion. I tend to look at them to get an idea of how the progenitor originally conceptualized a moment, and because they sometimes subsequently incite what I discuss in the next bullet…)

  • What is said by the characters (This is a little less elastic then stage directions, but still can be interpreted with some discretion. Ex: a character may say, “Would you look at the time‽” which could mean there is a clock in view…or maybe it’s through a doorway to a room leading offstage, or a wristwatch…again, definitely more pressing then the stage directions, but still some room to wiggle depending on what the director is looking for in the moment.)

I usually go by a rule of three reads at least when I get a script. The first read: try and just read the piece for what it is (don’t turn on the design brain, just react to the piece as is). Second time: I start notating any words I don’t know, putting in questions (does the director see this as inside or outside? Clarify how we want to make this work etc.). The third time is where I’ll start sketching little thumbnails in the margins and getting a little more designer-y (ex. how can we show the contrast of how this character is processing their inner darkness in this moment of death as opposed to their complete jubilation later when they return from the depths of despair….yeah, my teenage anxt self can come back in my notes, don’t judge).

Soooo, Little Shop of Horrors is a wild show with a wild script to match. Musicals, to start, already present their own special challenges. They often have:

  • Multiple locations

  • You have to shift through to those locations very quickly and seamlessly because, tempo people!

  • You have to style the world so that it’s a place where people believably express themselves through song on a regular basis.

  • Often there is a large-ish cast (**Little Shop is somewhat an exception here. We were going to have 12 people in our production, but that was because we fleshed out a small ensemble. I have seen the show done with just 8 people).

  • Practically, you have make sure the scenery supports the action and the choreography.

Little Shop has all these fun things plus one teeny tiny extra thing; A VERY LARGE AND VERY ACTIVE PUPPET.

To be specific (in our show) four puppets. Three out of those four need to very strongly interact with the set. Especially the final puppet, the largest one that has to successfully eat three people live onstage (one of whom is running at full speed into it with a machete, but, meh, details) safely and effectively. This isn’t even getting into the practicality of how we seamlessly move these various puppets on and offstage without audience seeing the moves…nope we aren’t even close to thinking about that yet.

At the point where I got through my three readings of the script, I found myself of two minds.

The first:

UMMMMMMMMM………..

UMMMMMMMMM………..

And the second:

EEEEEEEE!!!!!

EEEEEEEE!!!!!


This is an iconic musical. This is one that holds a warm place in the hearts of many, including my own. The music is just good!! I mean, it has so few reprisals, the whole show is full of new songs that span the gamut in style and yet all work beautifully. The plot is macabre and utterly ridiculous, but it does beg the questions that are close and uncomfortable; how far would you go to gain financial security? To never have to worry about anything ever again? To be adored and held in esteem for no other reason than you own something unique? How far would you go to escape poverty, abuse, and danger to achieve the promise of love, prosperity, and a bright future? The show is whimsical, but it’s not fluffy.

This is where I got to in my analysis of the script. I had some ideas about what we were going to need. But, before I could clarify and move on I obviously had very important people I needed to start being in close concert with from here on out; the director and the rest of the creative team.

Lost and Found (A "thesis" story) by Kristen Zarabozo

OFFICIAL DESIGN ASSIGNMENT OFFER

OFFICIAL DESIGN ASSIGNMENT OFFER

This was the email I’d been waiting for.

To briefly to introduce you to the circumstances I’m an MFA candidate in Scenic Design at the University of Connecticut. Part of the deal is that I’m technically a designer in residence for the Connecticut Repertory Theatre for the academic year. Myself and my fellow grad students, and sometimes undergraduate, are often the ones designing the various aspects of the shows that are produced by CRT outside of the Nutmeg summer shows. In our third year of grad school, one of our show assignments also acts as our MFA Project (which we refer to as our “thesis” show even though technically it’s a Master’s Project). In addition to fully designing a realized production in the season, we produce a “book” that catalogs our whole process and all the pertinent materials necessary to our design. We then have to present that documentation and discuss our work with a committee that then formally determines if we have successfully accomplished our Project.

Little Shop of Horrors presented at the Harriet S. Jorgensen Theatre by the Connecticut Repertory Theatre, is my MFA Project. The email above was the official confirmation of that assignment. I smiled wide when I got it. Little Shop holds a warm place in my heart, and I knew it would be a “thesis” worthy challenge. Plus, there was some fun history with the director that I will reveal in later posts. I knew it was a beast of a show. I was already anxious about whether I could actually meet the demands it required. Still, I’d wanted it badly. It was mine, and I was going to do my utmost to make it amazing.

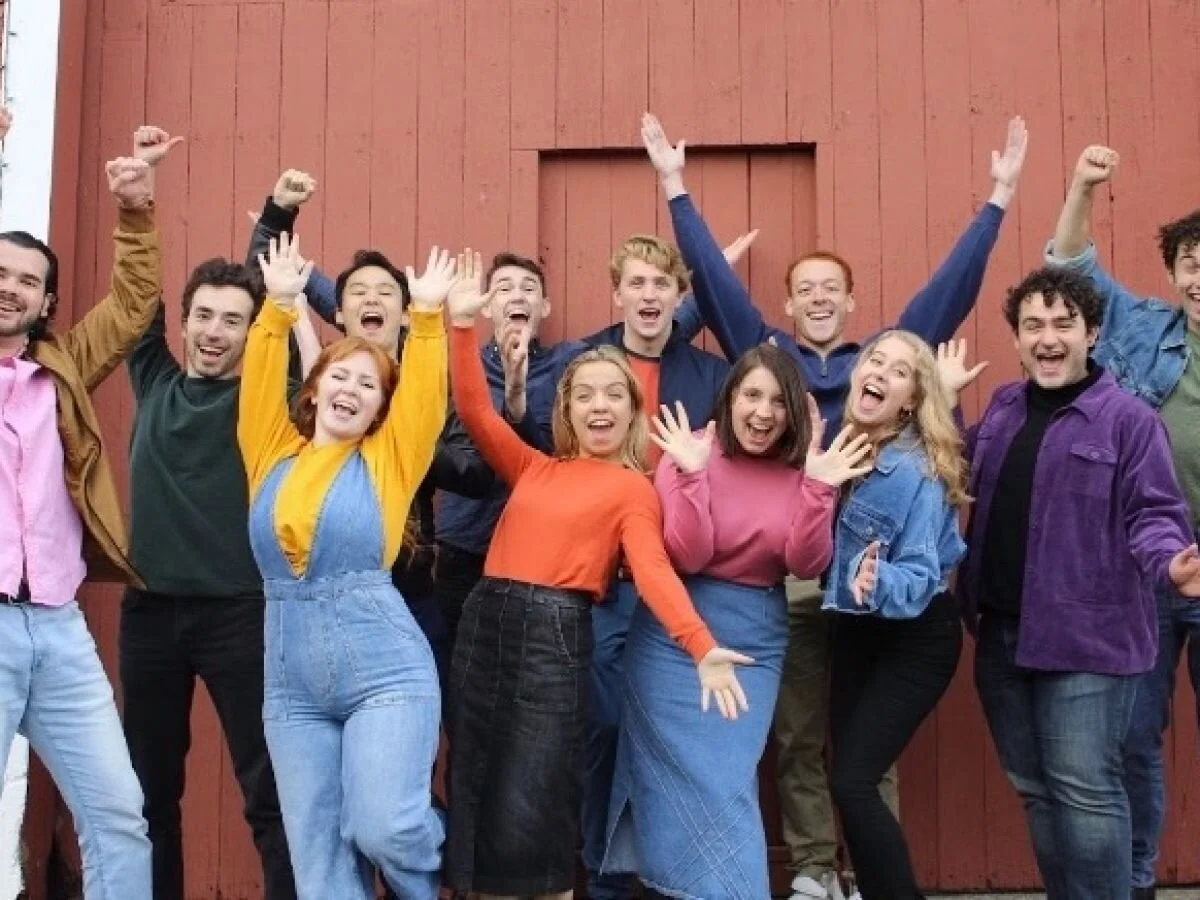
Obviously….some things are different now. I find myself in the place of many of my fellow theatre artists. Our show is canceled as a complication of COVID19 prevention measures. This is painful. The creative team has been working actively together on this production since November 15th of 2019; some of us had been working on it since April of that same year. We had just gotten to the point where we had first rehearsals and we were just beginning production of the scenery and other elements. It was going to be a really good show. The cast was excellent, the production facilities new and ready to handle the scale of the show, and the designs…..they were all quite stellar. Another casualty among the myriad of consequences that I’m sure we will still be navigating years from now.

I have mourned for that unrealized piece of my work. I was deeply excited to see it in motion; more excited than I’ve really admitted even to those closest to me because I cry ugly and I prefer to to do that in private. Now, though, what’s left? Actually, quite a lot.

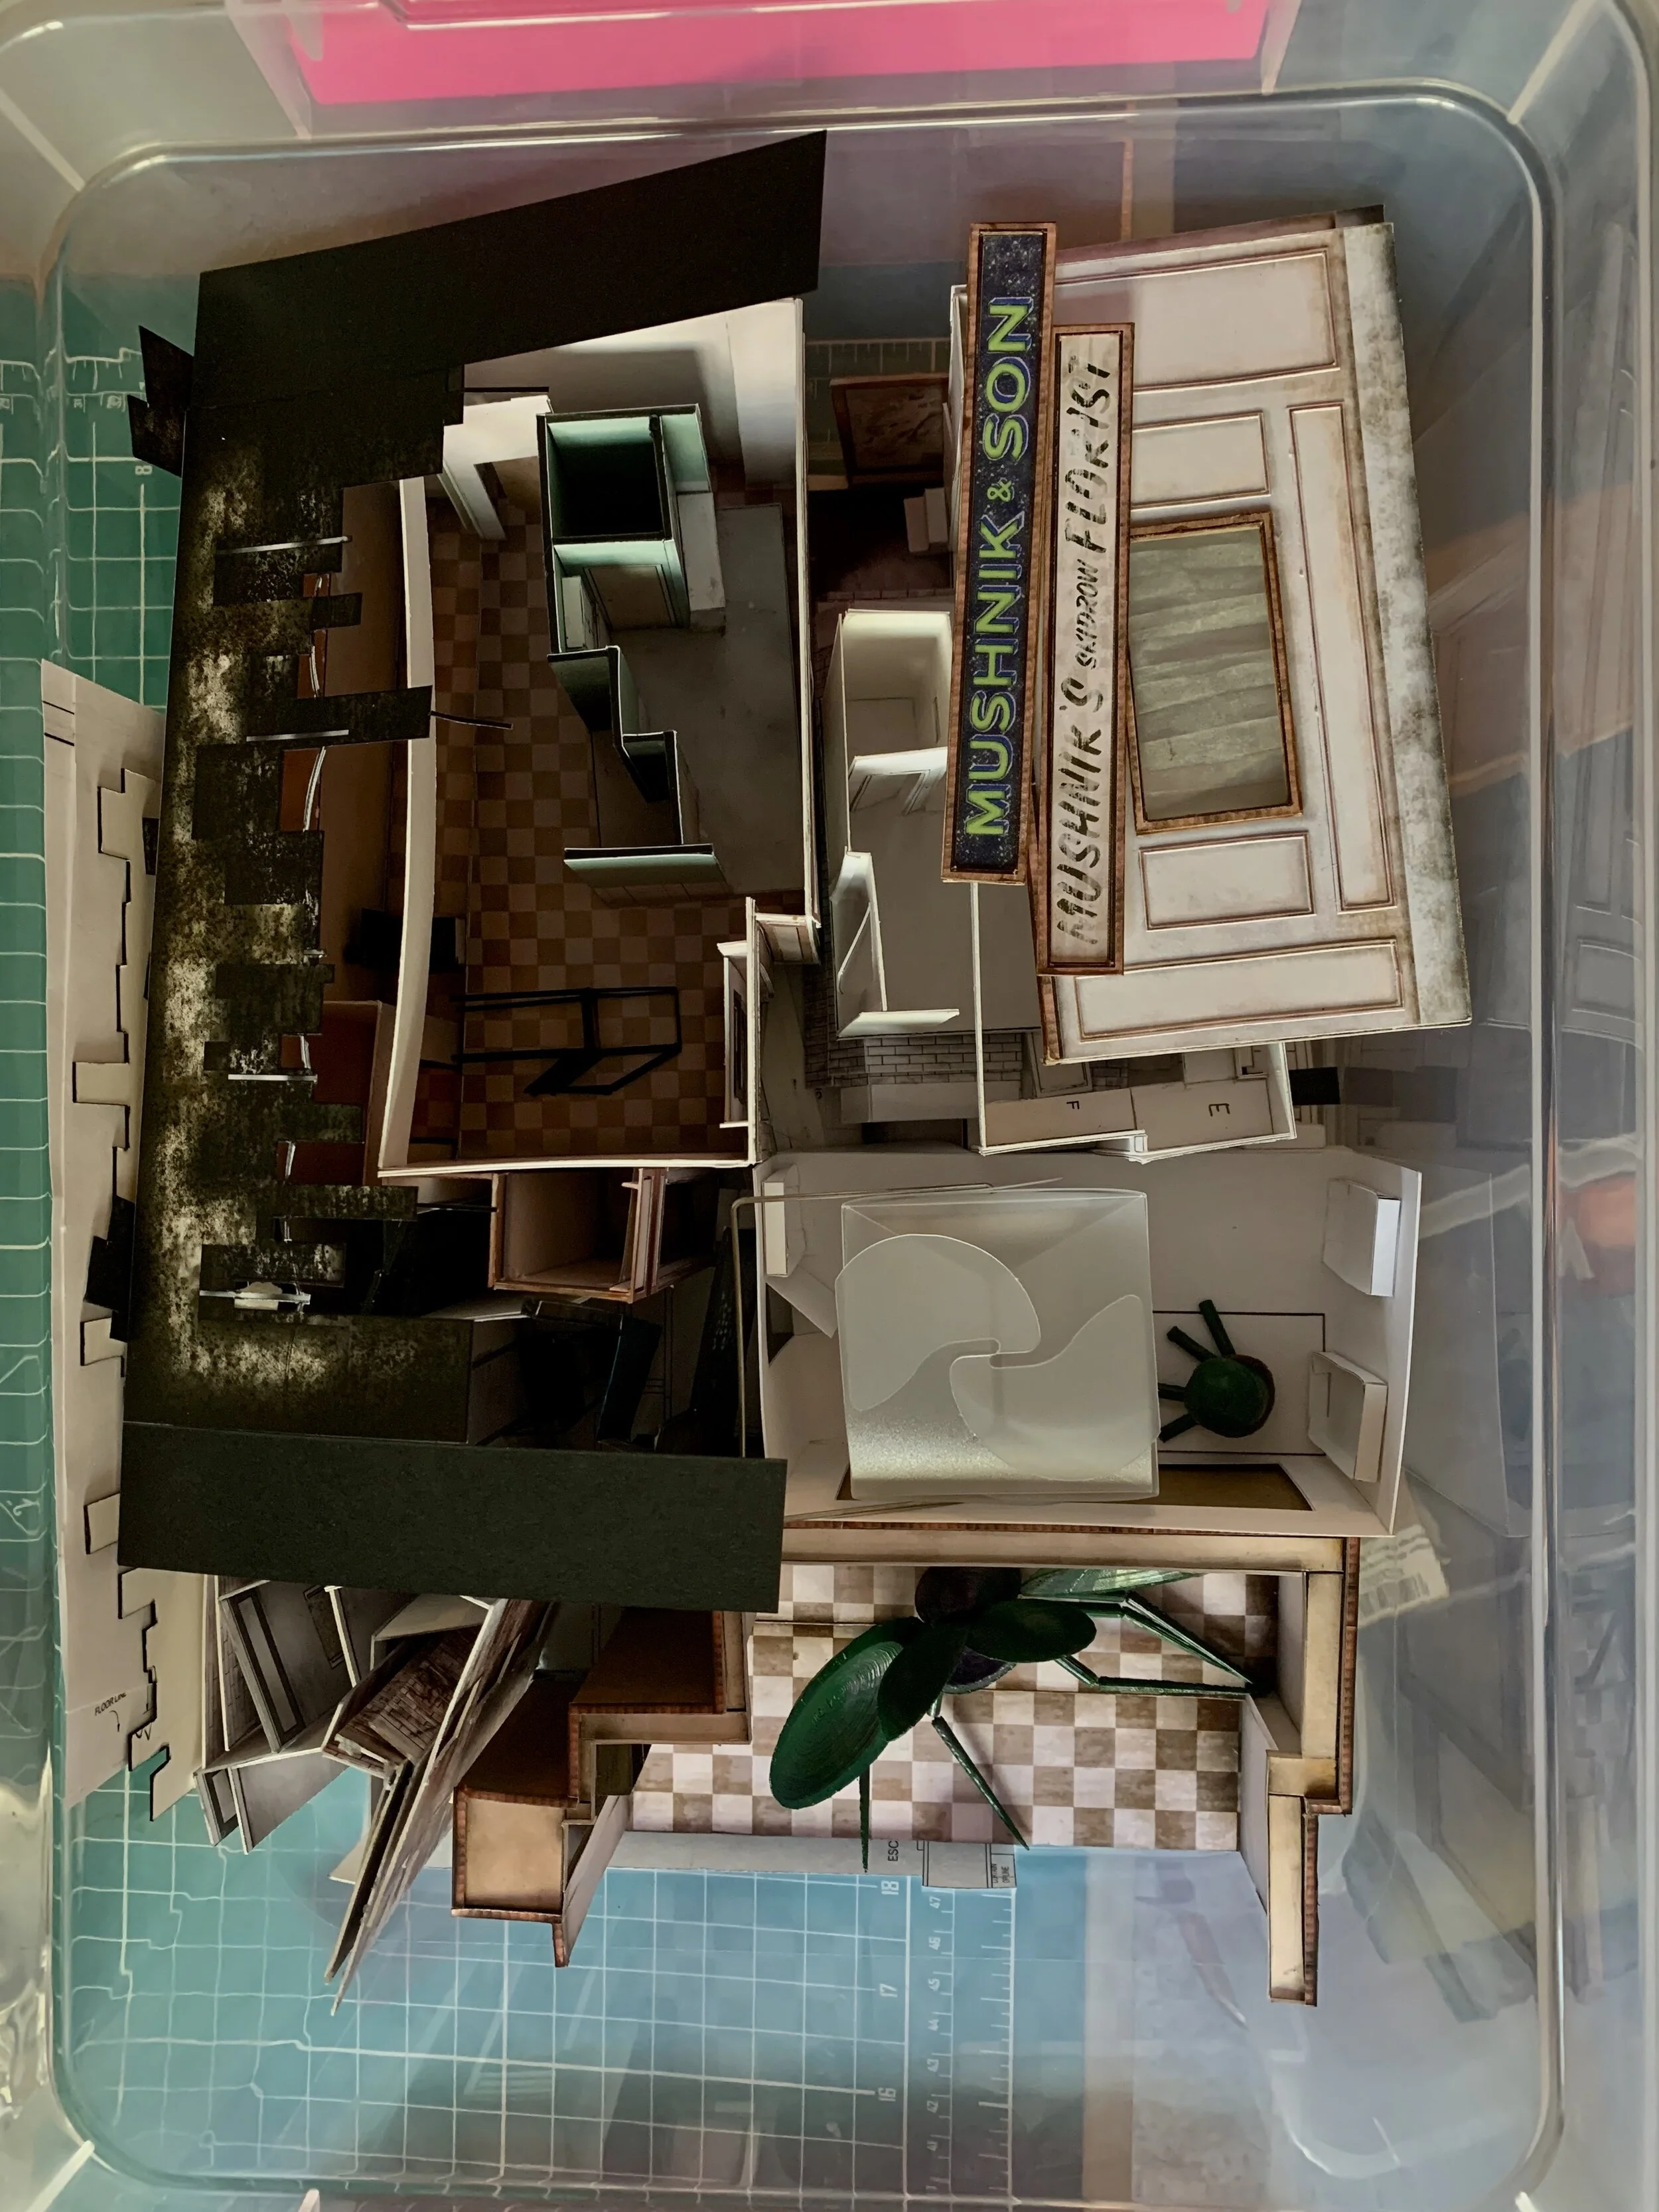
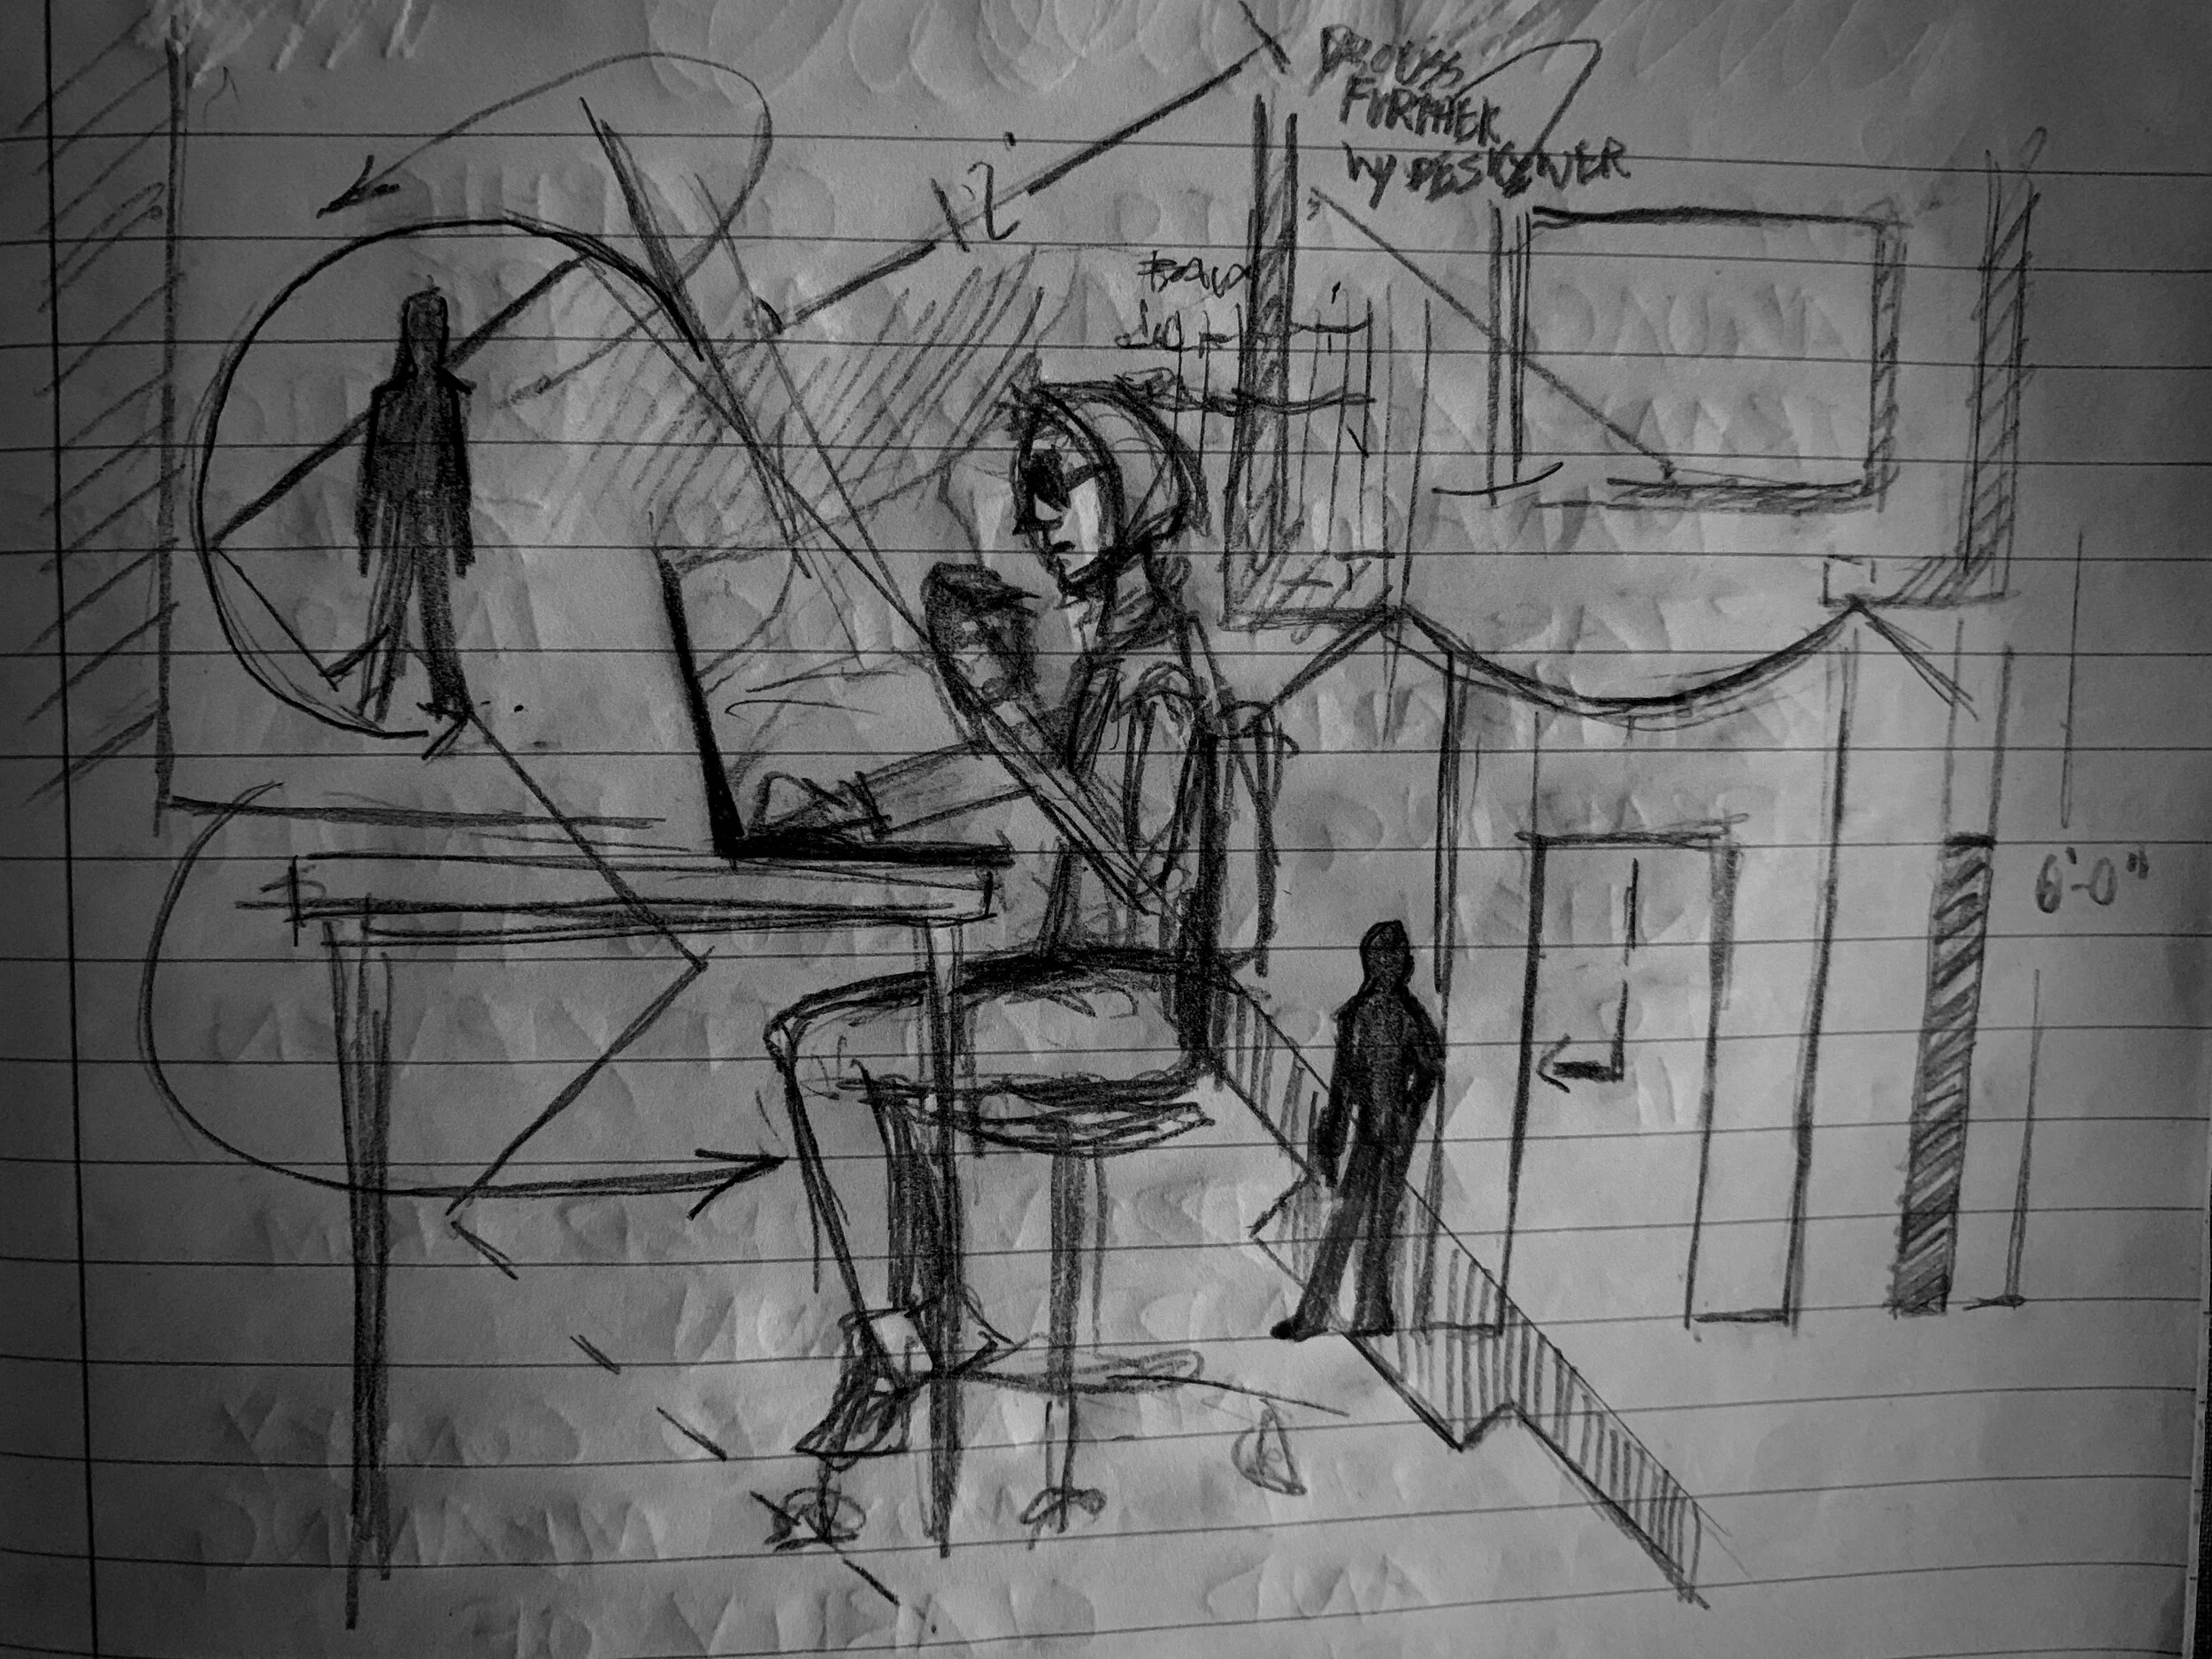
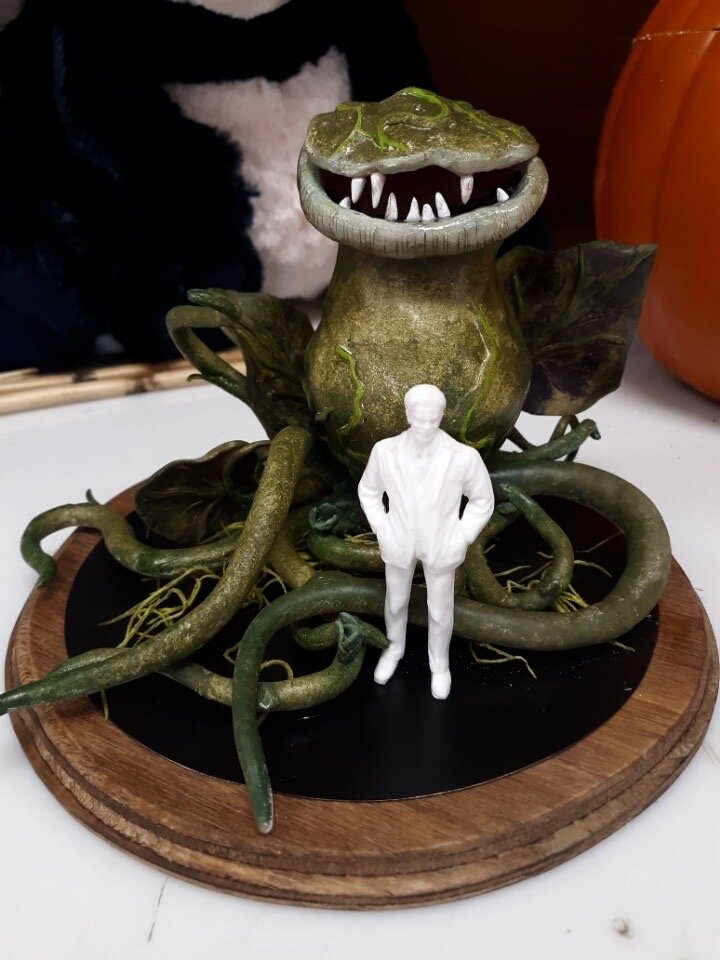
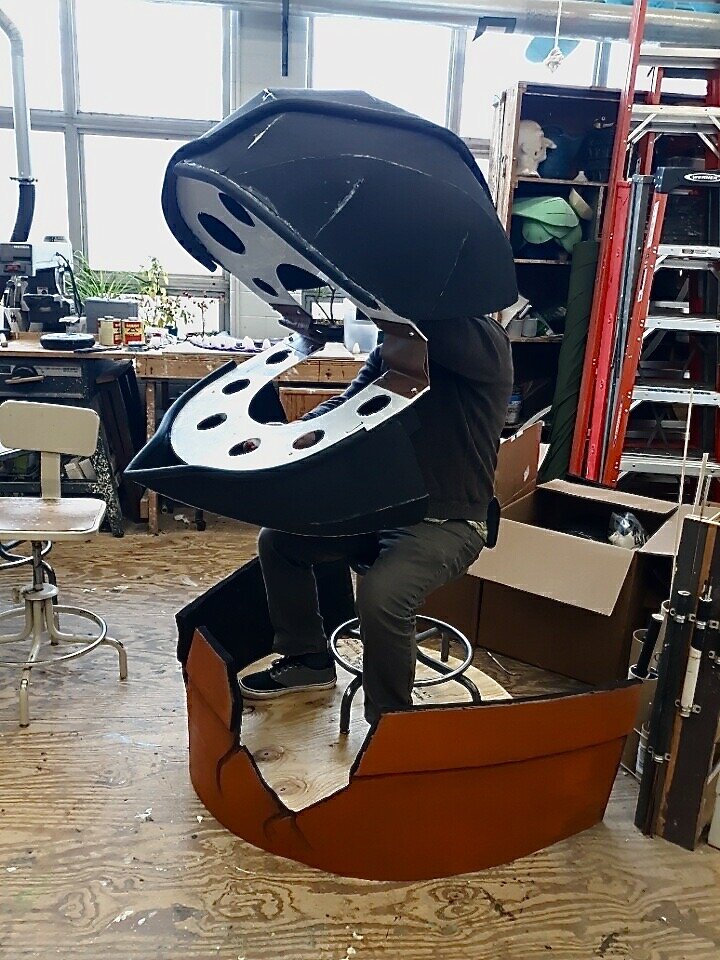
See, I’m really lucky. I’ve done a huge amount of work, all the creative team has. We’ve been living with this show since November (design process at CRT is quite long), and for me that means I’ve produced 3/4 of the materials that I would have ultimately needed for my show in full. I have pages of research images, sketches, a veritable graveyard of model pieces, a fully colored (and darn good looking) color model, a completed drafting package, detailed paint elevations, and miles of photographic proof that this design was real. I’m sad that I won’t be able to include pictures of the pieces coming to life full size. I won’t be able to gasp in delight as the actors interact with the world we made, but, all is not sadness.

My Project is safe (i.e. I can still present and graduate on time) because thankfully it’s set up to be flexible. So long as I did the work (and oh I most definitely did!), I can’t be penalized for something as unprecedented as a pandemic. “In fact,” my mentor told me in a phone conversation not long after the school moved to online and the show was canceled, “documenting and responding to this event will make your thesis probably more interesting and unique than what anyone would have imagined previously.” I heard the subtle message intertwined in his already blatant encouragement; this is a rough situation that could prove a unique opportunity, use it.

And so, I am. I’m taking this space to open up my process. I’m going to walk through the wild places of how the scenic design for this show came into being and show you, to the best of my abilities, what that design would have looked like had you had the opportunity to see the production. Obviously, no paltry model photos or orderly drafting will ever equal seeing a production. However, I would pose these questions to you; how often do you really get to see the design process showcased? How often does a designer stop to really show all the pieces that went into the model box in the display case at the end? Also, how often do we find ourselves with a little more time to actually explore that process in such detail?

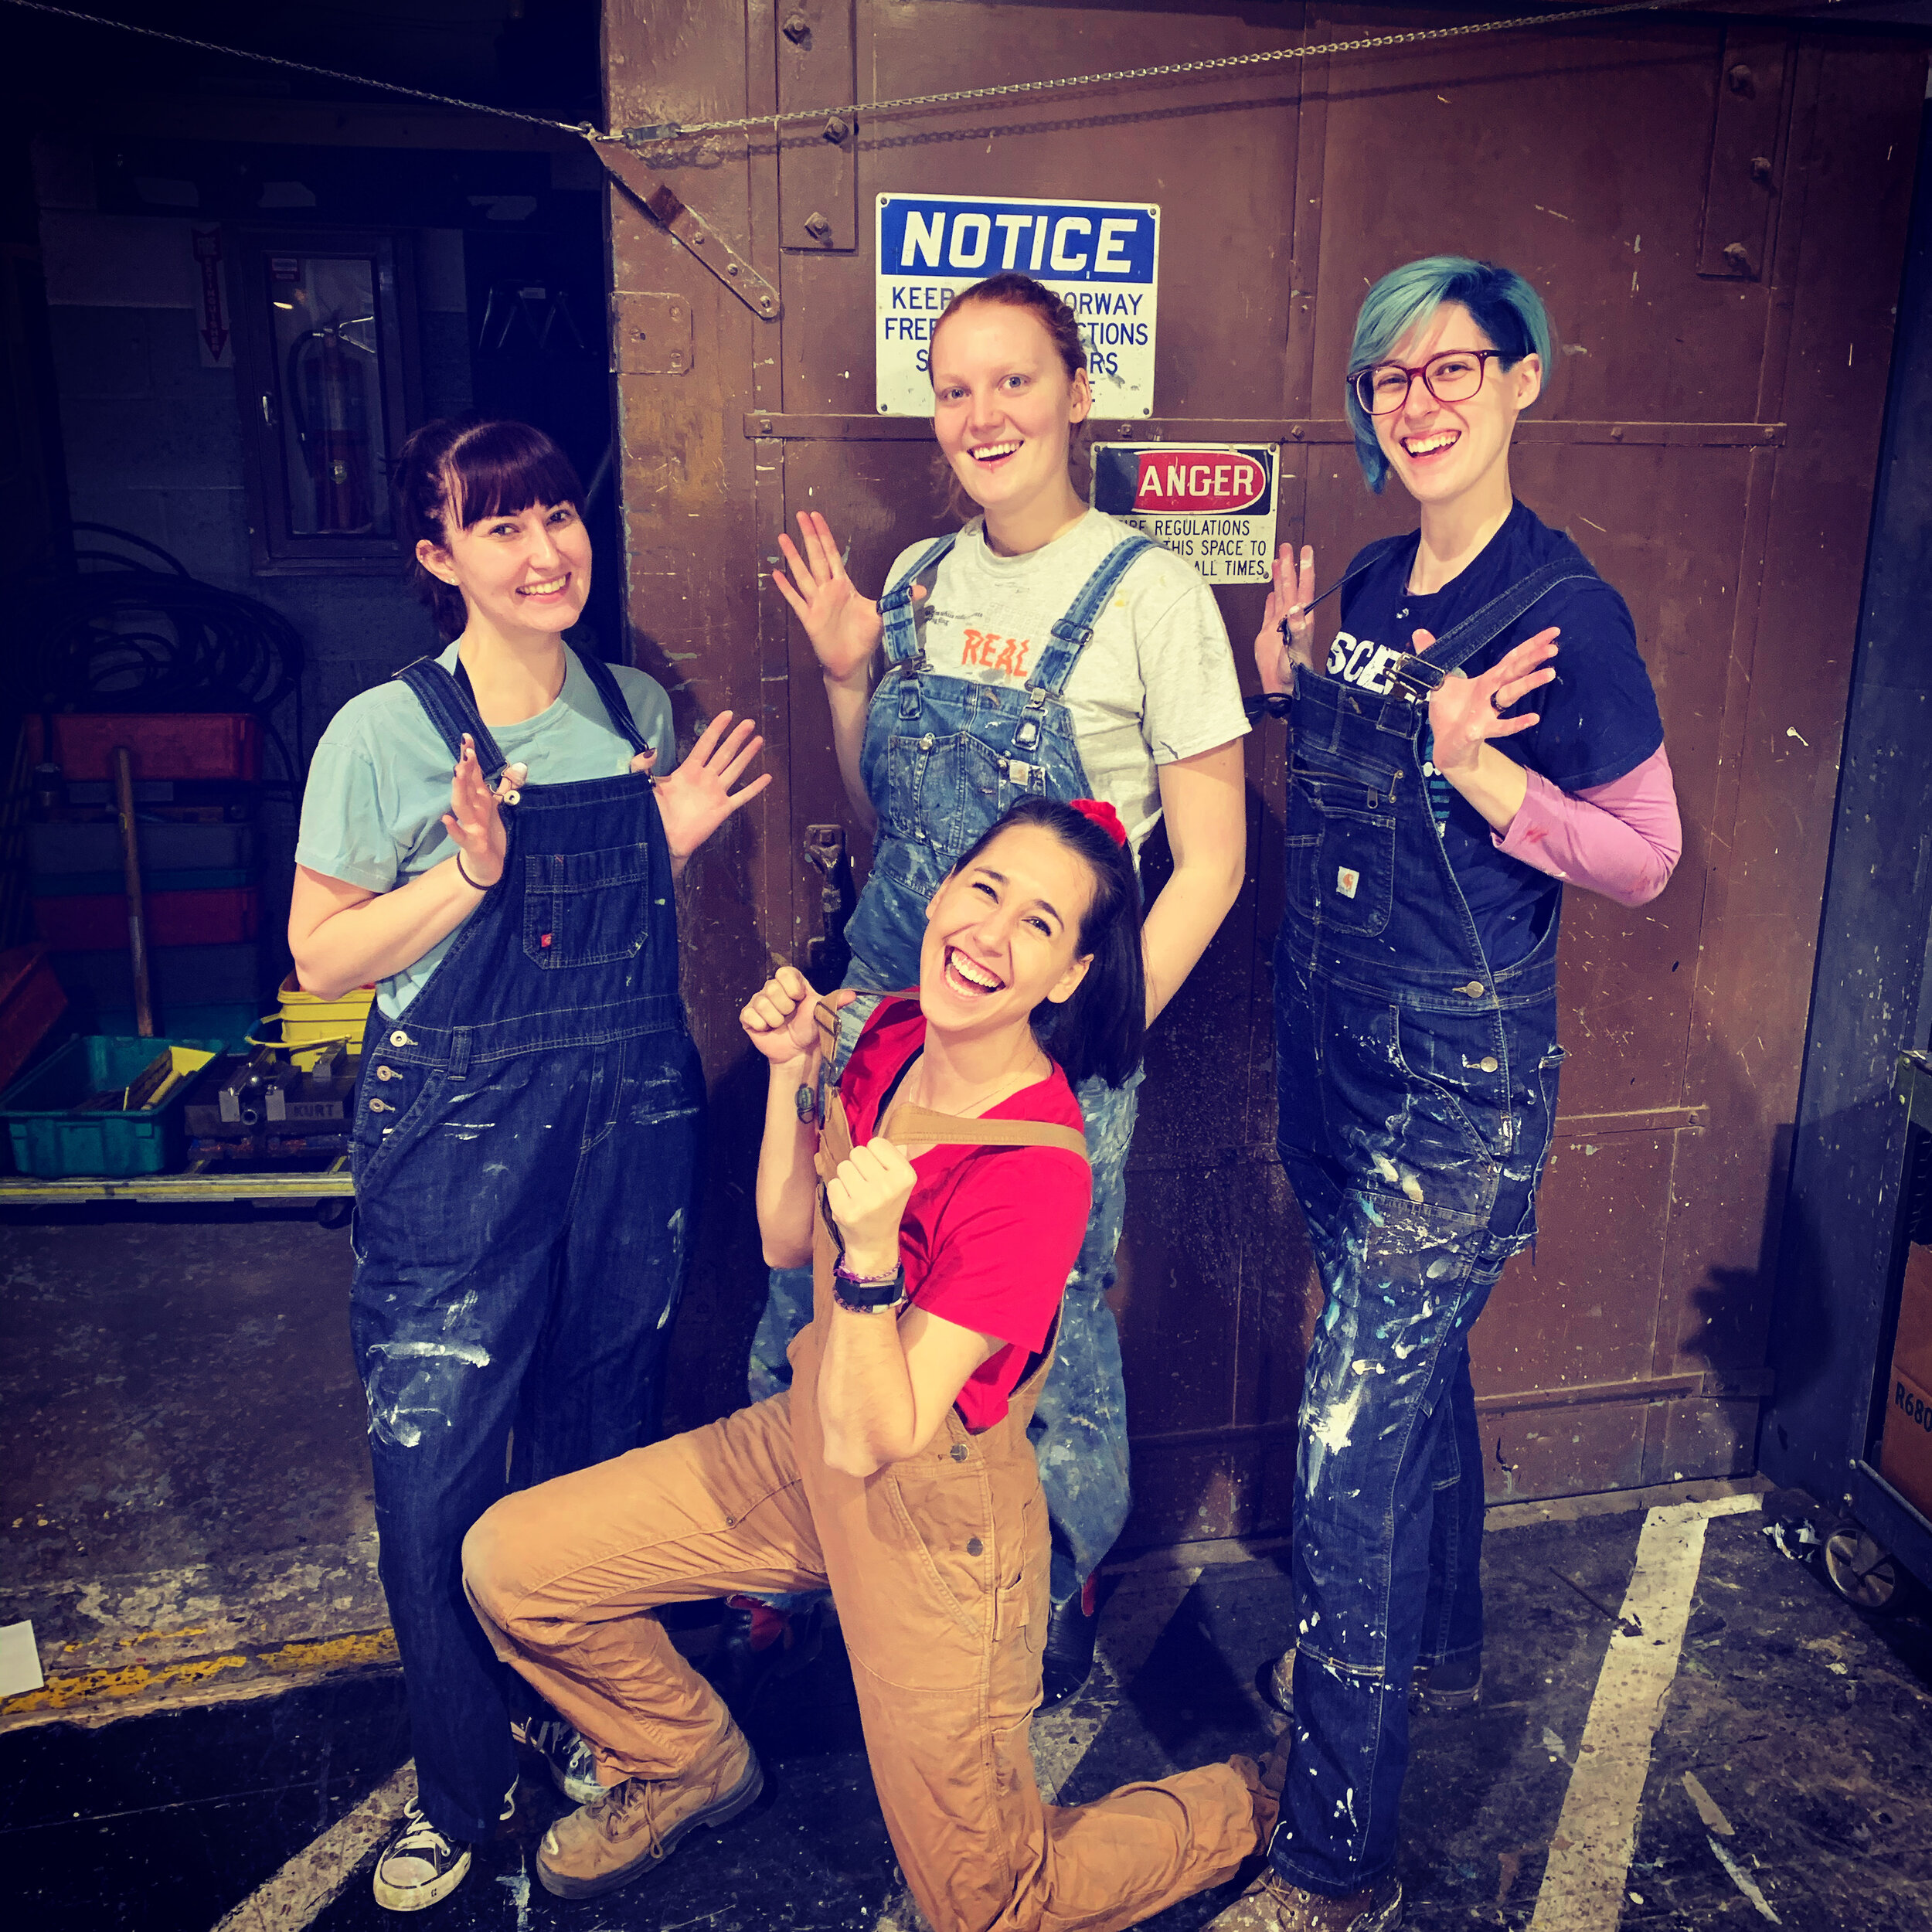
This journey is not just about me. It’s also about my collaborators. Sure I want to show you the process of my design, but more than half that process is inextricably tied to the relationships that I share with my collaborators. We have our specialties, but we are an ecosystem where every design decision profoundly affects everyone else’s choices. How we make those choices together and as individuals is what makes our art form unique. This team was amazing and I want to use this showcase to give you a glimpse of how the way we work together is really the thing that makes our work something worth seeing.

I will be showing and telling in detail. I hope you can see how hard we worked to bring you something wonderful. Even though this is a shadow of a thing deferred, this is the way I want you to see my work. This is my MFA Project, a culmination of three years of grueling labor to become better at my craft. I am proud of this. And so, from here, the posts will showcase parts of the process and the people in that process. Welcome to the Shop!

"Discuss Further with Designer" The note that covers all things by Kristen Zarabozo

So, this is a reference to a drafting note that I use a lot. Basically, as my mentor would put it, “When all else fails, notate the hell out of the drawing and make sure you always say to ‘discuss further with the designer’.” I love this note because it not only buys me some more time to think through how I actually want to draft/draw/paint/picture the thing (hey, just being real here, translating every micro-detail of a thought on to paper so other people can make it a reality is flipping hard), but it also encompasses the core of why I love this art form. To say it’s “collaborative” is an exercise in gross understatement. The entire core of our work as theatre artists hinges on one thing and one thing only; communication. So. Much. Communication.

Everything I produce as a designer is all an attempt to communicate what’s inside my brain to my fellow collaborators. Everyone from the director, to fellow designers, to the production team, management and actors; they all need to get as clear a picture of the world as they can in order to make a production a reality. And then times that a million for every person on the creative team. Each designer is constantly trying to communicate their choices to at least two other entities (director and a shop) in order to make the show reality.

Now, I’m a scenic designer. Let me start by saying that EVERY DESIGNER’S JOB IS CRAZY (caps for emphasis). We all have nuances and details to our jobs that makes its own unique challenges. What are the unique challenges for the scenic designer? Well, if I had to limit to less than a series of encyclopedias, here is the short list:

  • Scenic designers are usually first “boots on the ground” so to speak. They are the ones often connecting with the director first to establish the physical parameters of the world. This puts a bit of pressure considering they are the first translators of the director’s thoughts; not to mention that a good portion of the rest of the creative team’s work (especially lighting) is going to have to harmonize in reaction to what is physically established. Yup, totes fine.

  • Scenic designers are interfacing with at least two productions shops (technical direction and paints) often three (add props) and even more if you get into the land of practical lighting (electrics). For some perspective, imagine if, just to get your breakfast in the morning, you had to write/draw/meet with three-five different people, each being responsible for putting together a different aspect of the meal. These three to five people are also seasoned professionals who can provide the parameters on what can actually be accomplished for breakfast that day and you need to come back with reactions to that information….yeah maybe just wait until lunch.

Obviously there’s much more I could list, but those two things are the particulars to my little slice of the process as I’ve seen it so far. Granted, I’m admittedly a fresh designer ultimately starting to establish herself, so definitely take what I’ve observed with a grain of experienced salt for sure. Also, and this I will repeat, I am working within the American theatre model. There are definitely exceptions and variations on all themes and “truisms” even from theatre to theatre.

Bottom line, this is all opinion and discovery based in my own experience, past and current-ongoing. I am learning and shifting my paradigms everyday. My opinions will grow and change as I grow through my time in this industry; so I write this in real time. I want this to be a place where I can share in a wider “discussion” with the designer. Whether you are a veteran theatre artist who enjoys looking at other artists interactions with the work, or someone who is brand new to looking at this kind of work at all, I bid you welcome. Get ready for a wild ride!